Device specifications
| Power supply | DC, 5V, 3A |
|---|---|
| Connector | USB-C |
| Networks | Wi-Fi, Bluetooth |
| JumpY | light panel |
| Dimensions | 1200 mm x 300 mm |
| Housing | Aluminum frame, Forex boards, extruded acrylic, EVA foam |
| JumpY sensor | optional distance sensor |
| Dimensions | Width 70 mm Height 50 mm Length 45 mm |
| Battery | Li-Ion 18650 |
| Housing | PET-G |
System description and safety notes
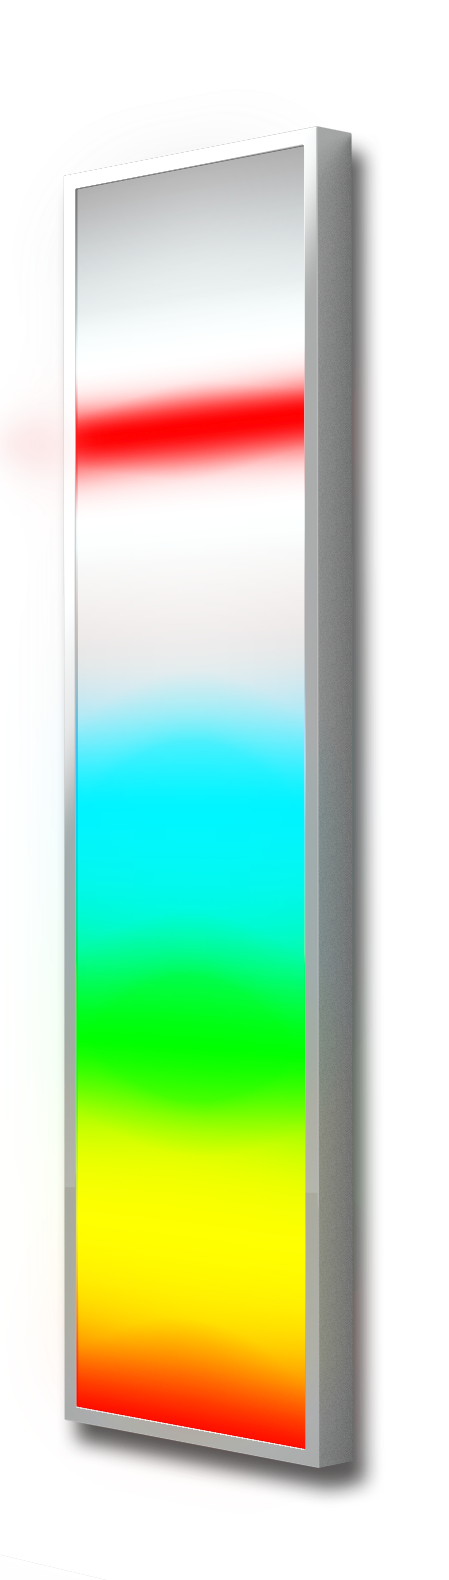
JumpY is a multifunctional light panel with dimensions of 120x30 cm, primarily intended for audiovisual and sensorimotor stimulation. It can react to the sound level using a built-in microphone of exceptional sensitivity, and it can also connect wirelessly to the accompanying distance sensor. Its numerous operating modes are selected using the mobile application.
The light panel is not intended for any physical contact with the user! Do not touch or strike its light surface!
Putting the system into operation
The JumpY panel is intended for wall mounting. The mounting instructions are on the following page. If you need to move it often, you can, at your own responsibility, use it without fastening as well. The JumpY panel is the only VoiceToys device that must be connected to the electrical grid during operation. Therefore, before use, make sure that you have a power source nearby. The device is powered by a cable with a USB-C connector. The connector is located on the lower right side of the light panel, immediately below the switch.
Using it, connect a standard USB adapter, minimum 5V/3A, to the electrical grid. Turn on the switch. The device initializes by emitting red color. After a short initialization period the device begins to operate, and that in the mode in which it operated during the previous use.
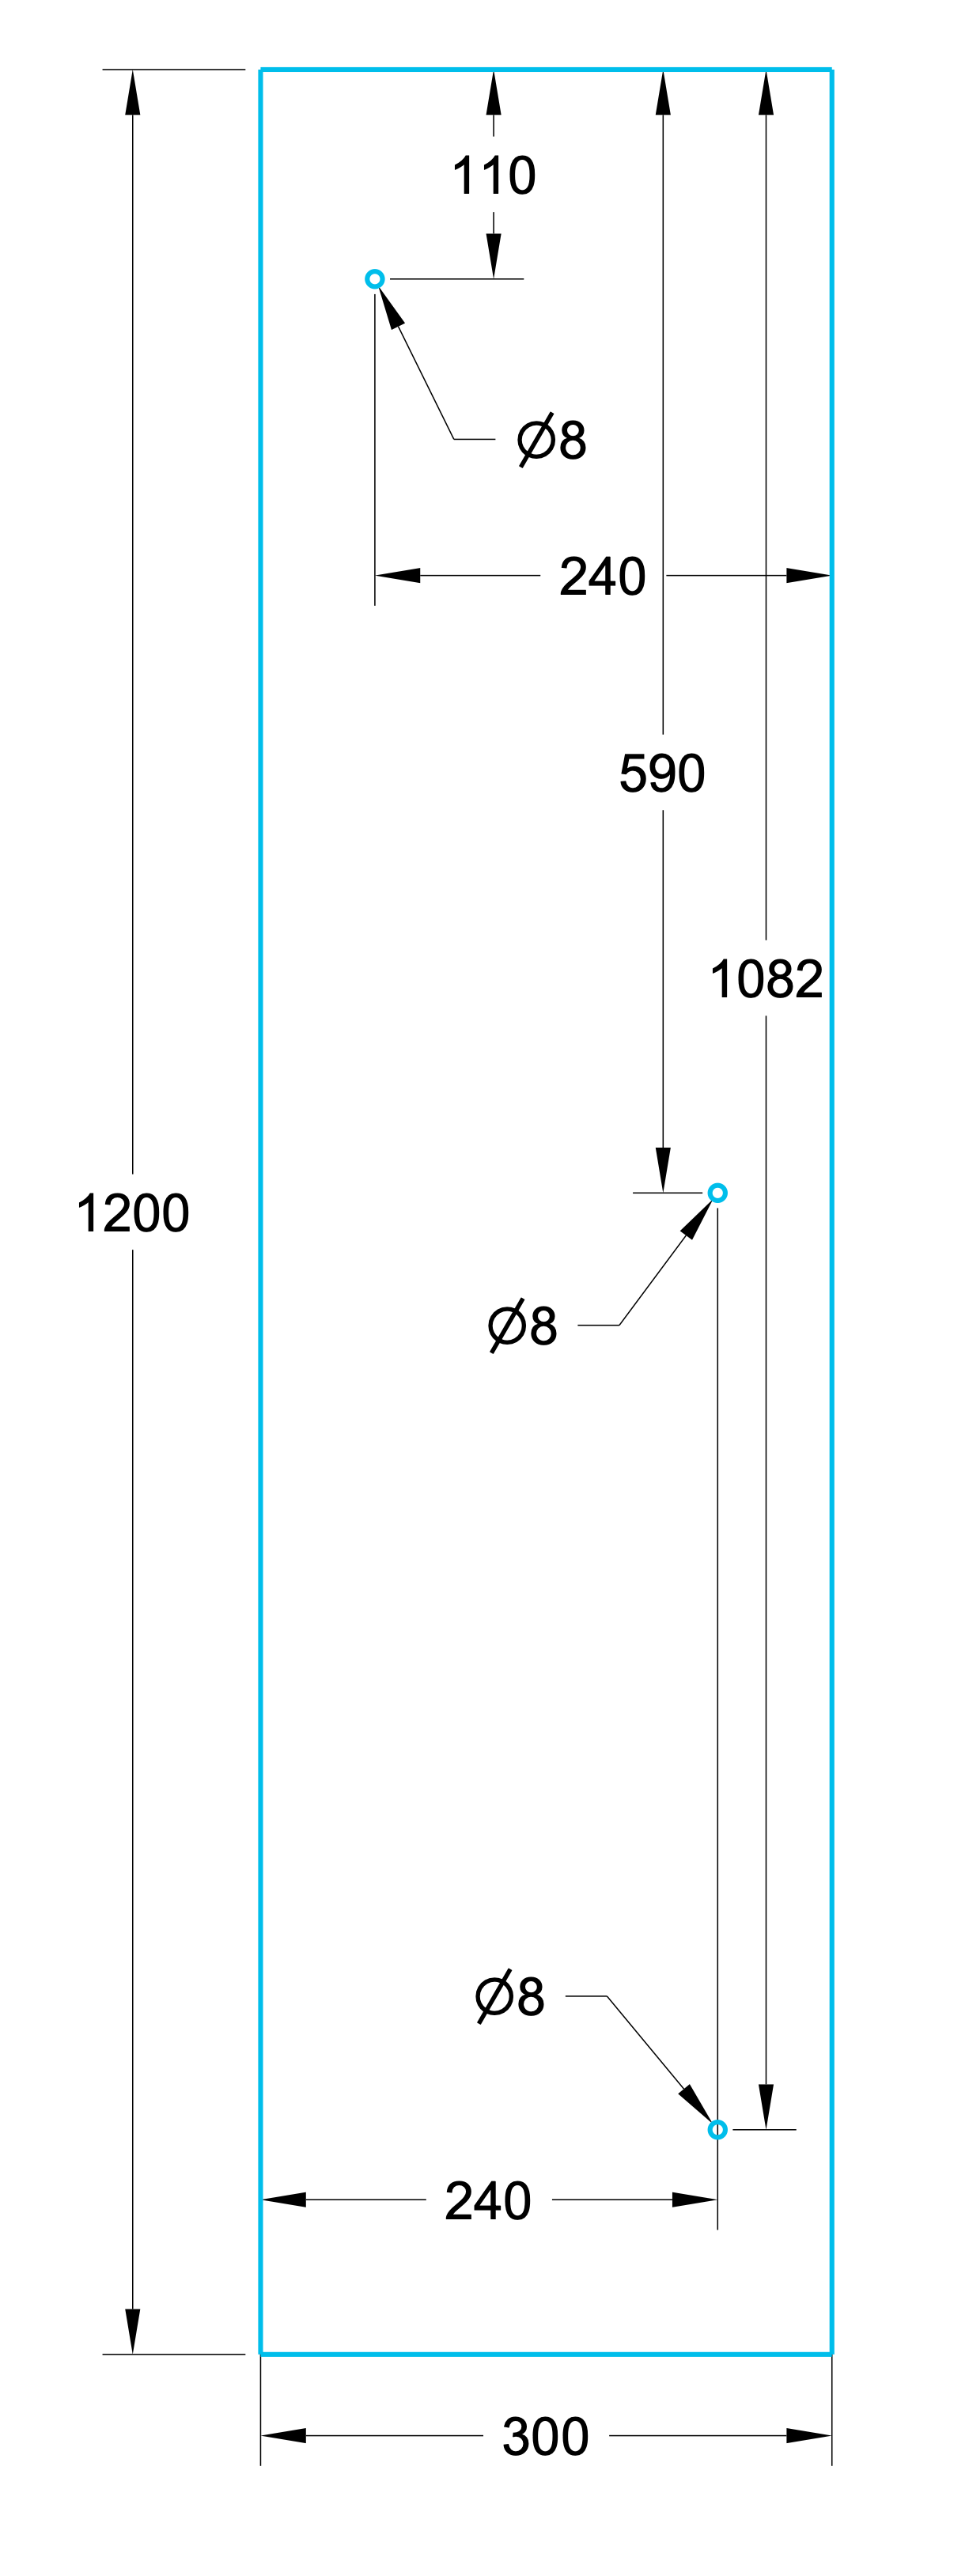
MOUNTING the device The total dimensions of the device are 1200x300 mm.
The device is fastened using three screws with a head diameter of 8mm and a body of 5mm, with a length of minimum 100 mm.
According to the enclosed diagram, drill holes in the wall, and fasten screws or hooks in them with wall plugs. After that, carefully place the device on them.
Leave enough space on the lower right side for the power connector and the control of the switch.
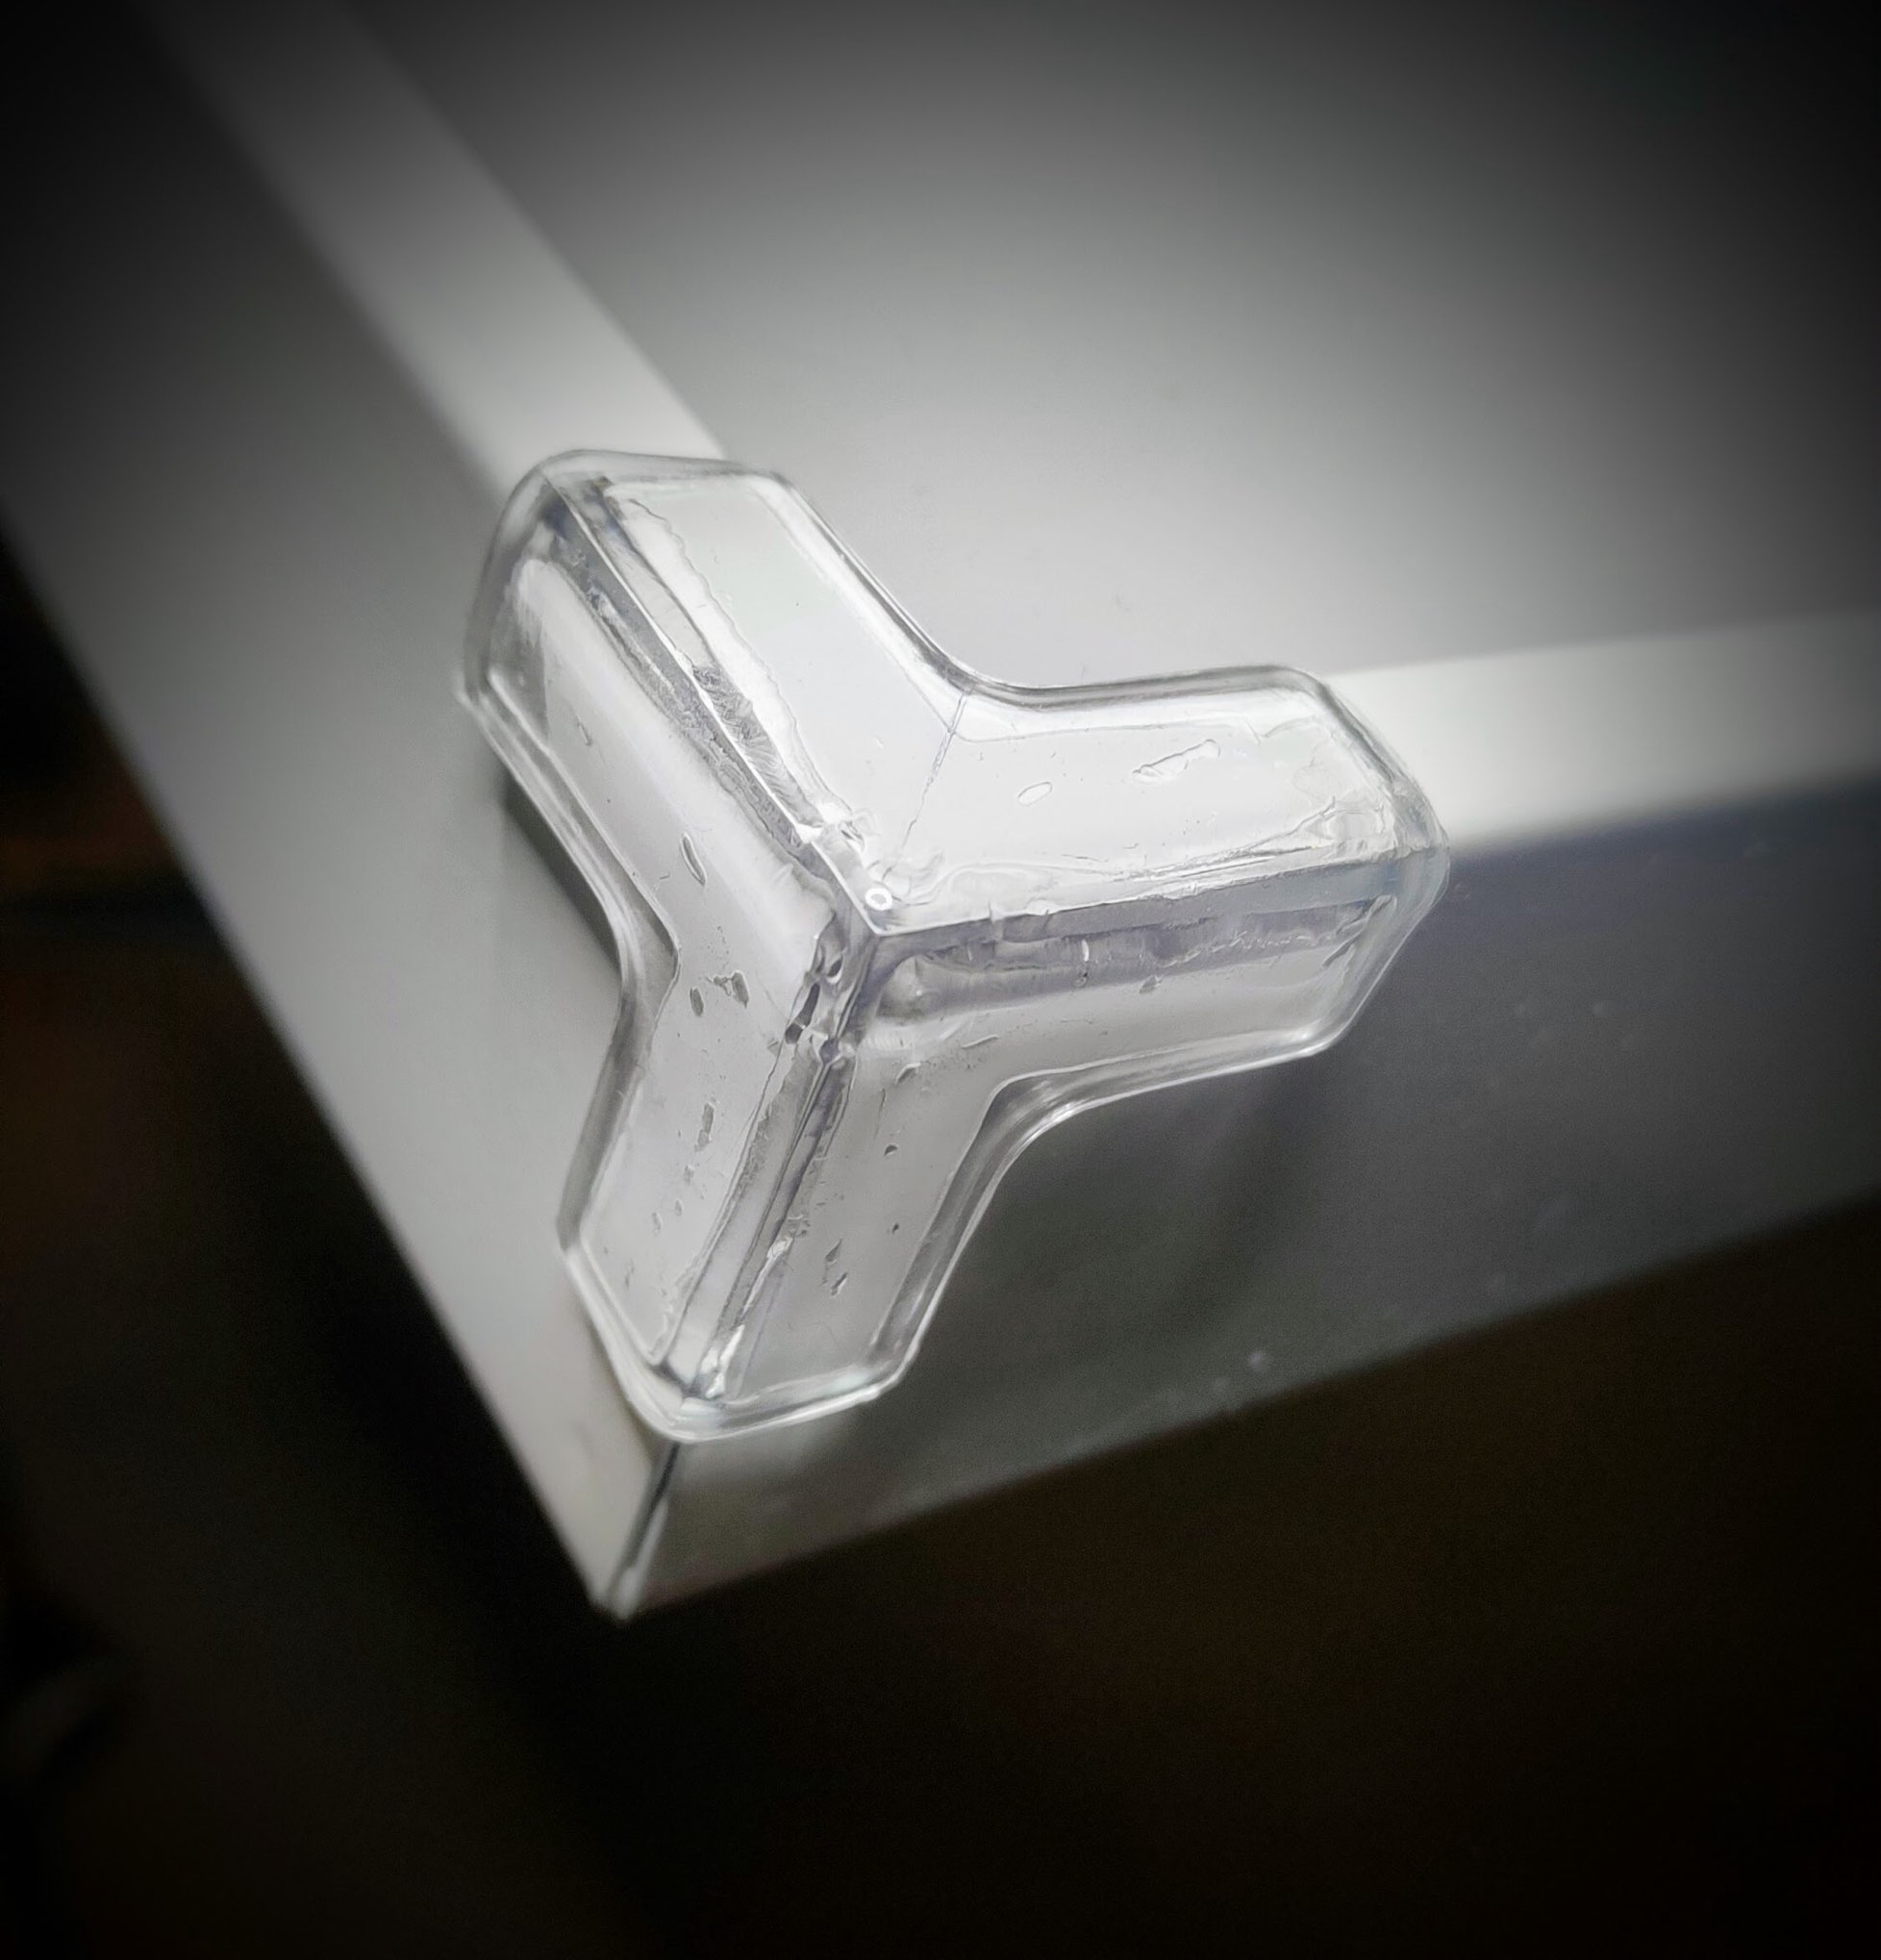
After mounting, fasten the enclosed self-adhesive corner protectors to the corners of the device.
Mobile application functions for the JumpY device
Selecting the operating mode and fine-tuning the device are done using the VoiceToys application. Before launching the mobile application, be sure to turn on the JumpY device so that it connects to the application. The devices (light panel and distance sensor) connect automatically, without any additional setup, and react to sound immediately after turning on.
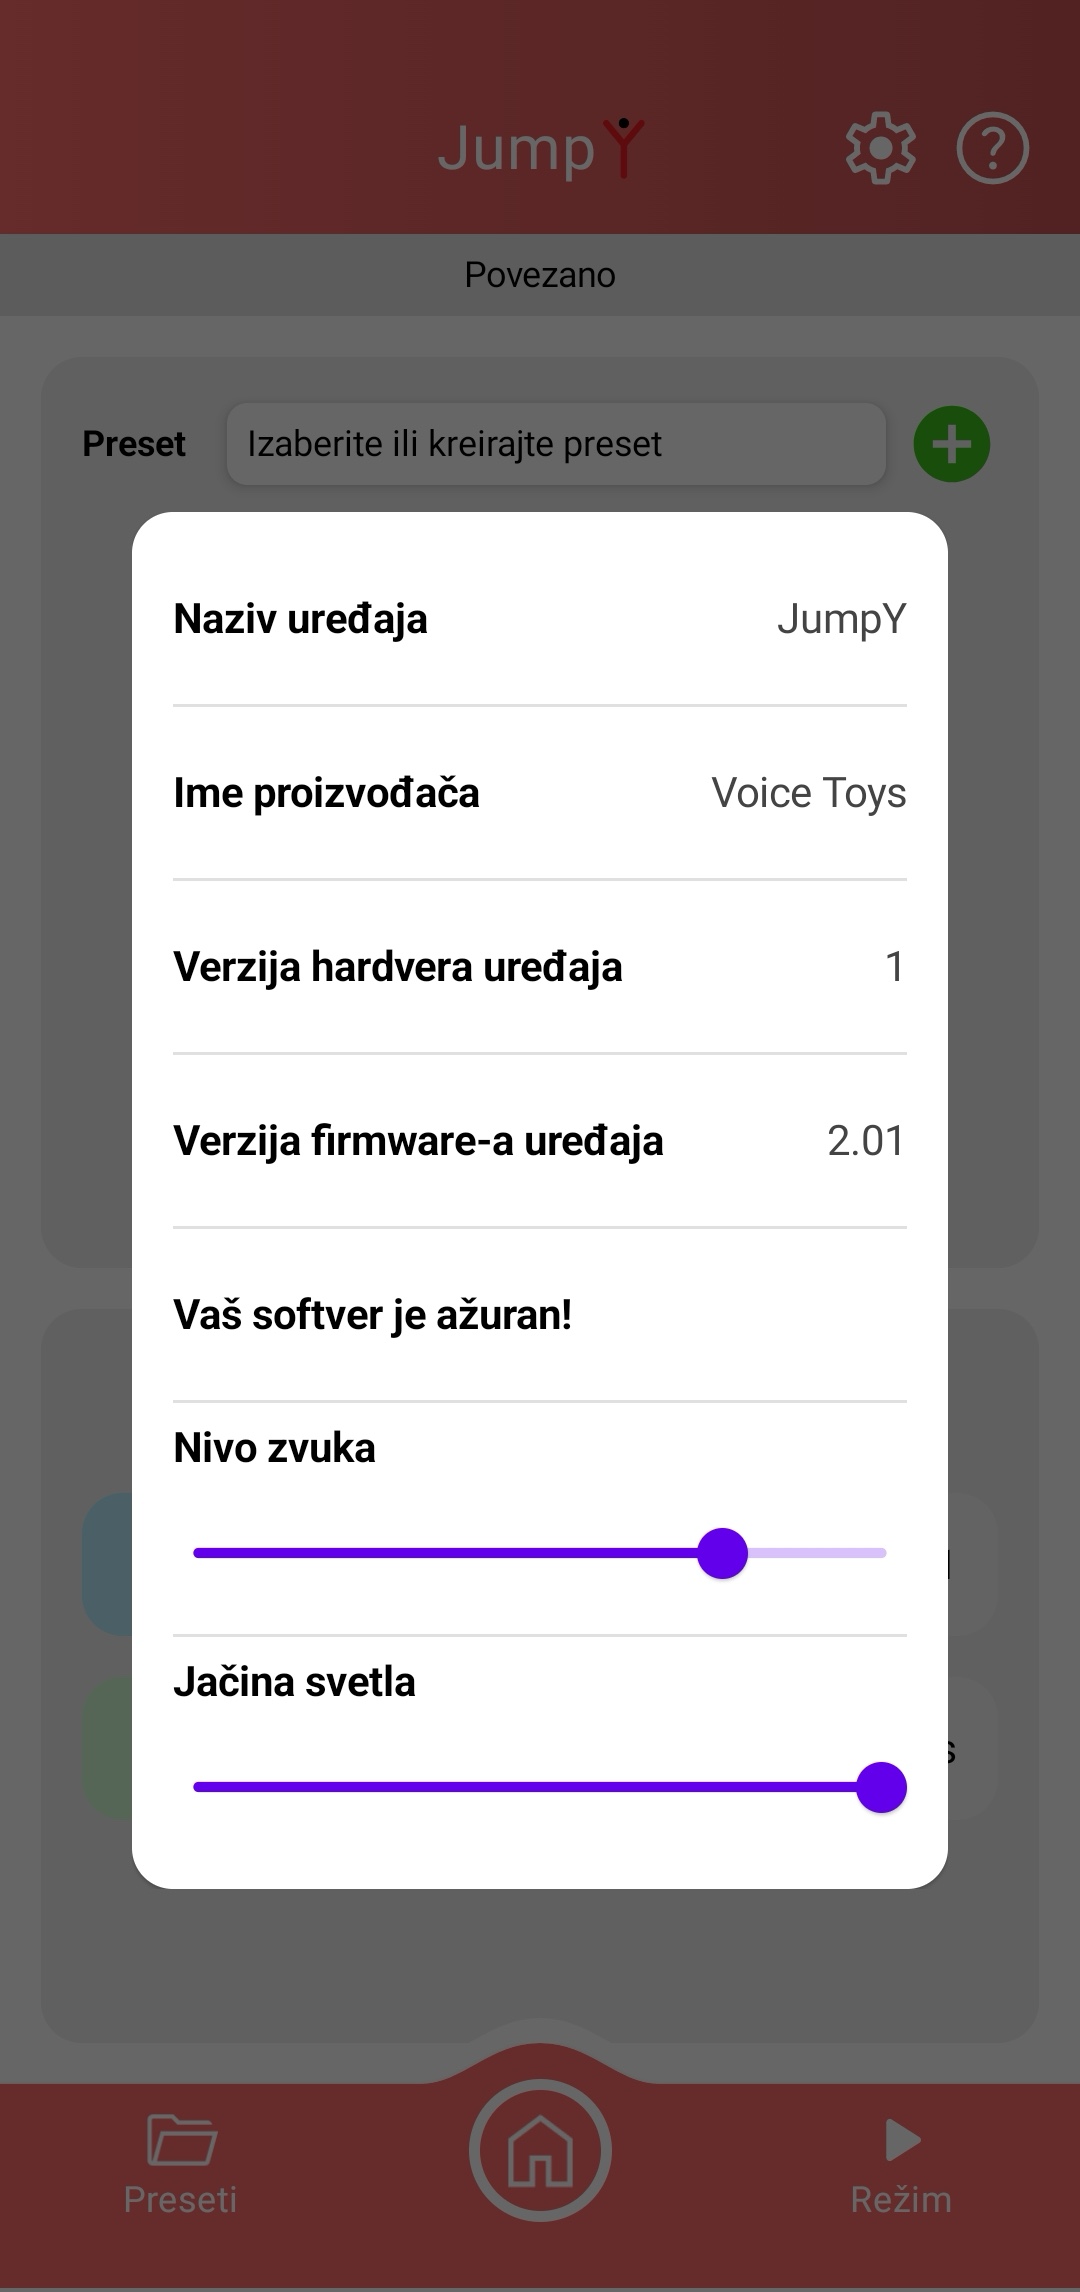
Screen view after pressing the gear symbol.
After turning on the device, on the application's home screen (shown on page 7) select the option "JumpY" when its symbol turns green. If the connection is successful, the light panel will briefly emit blue light, and the mobile application will take on the device's settings and display the values according to which it is currently operating.
In the upper red field of the application screen you can see the device name and the buttons for system information and help.
By pressing the gear symbol in the upper red field you will access the screen with device information, where you can see whether your device is updated, that is, whether the latest software version has been loaded into it.
You can also adjust the volume at which the reactions for correct and incorrect answers will be emitted, as well as the intensity of the light that the light panel emits.
By pressing any part of the screen shaded gray you return to the screen for the JumpY device.
By pressing the question mark symbol a text will appear that will help you recall the basic functions of the JumpY application. You can scroll the text down in order to read it to the end. At the bottom of the screen there is a "Watch video" button.
By pressing this button you will access a detailed video tutorial that will show you the complete instructions for using your JumpY device.
By pressing the "X" button you return to the screen of the JumpY device, in the mode in which you previously used it.
Operating modes of the JumpY device
The light panel with distance sensor JumpY offers several operating modes, with the following suggested purposes:
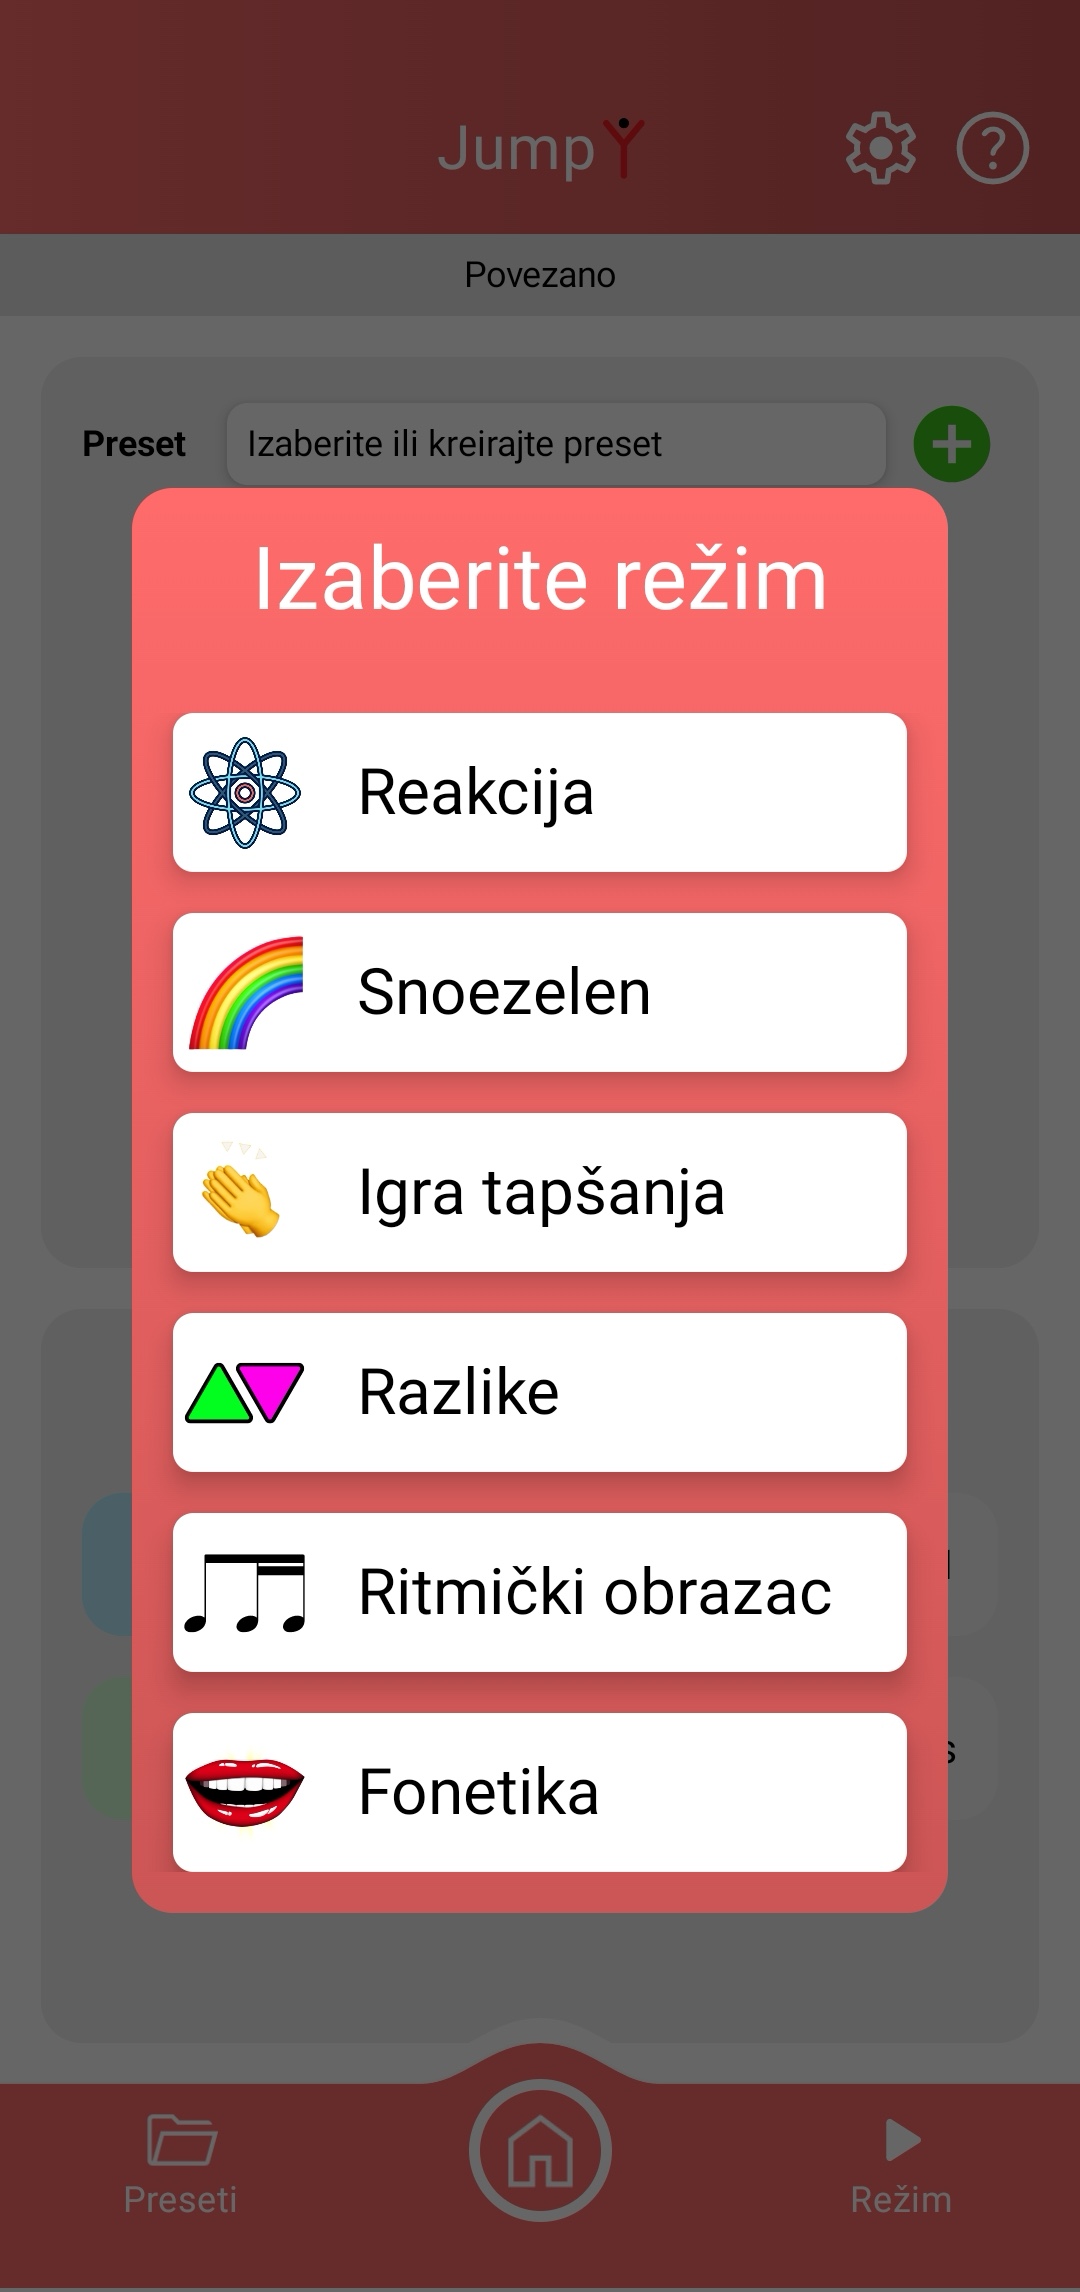
Operating modes of the JumpY device: screen view after pressing the "Mode" button.
Reaction - The lights on the device react to the stimulus from the microphone or the distance sensor
Snoezelen - Soothing multicolored lights
Reflex: - Original game for practicing focus, patience, reaction speed and gross motor skills
Differences: - Exercise in recognizing colors and the concepts same - different
Rhythmic pattern - Recognizing and repeating rhythmic patterns
Phonetics - Practicing formants and sibilants
The mode is selected by pressing the "Mode" button located in the right corner of the lower red field of the application screen. In the image on the right you can see the screen view after pressing the "Mode" button. When you touch the label with the desired mode, a screen for the detailed adjustment of that mode will appear.
Below, the ways of accessing and using each of the listed modes are explained.
Reaction
- Reaction to sound
After entering the menu for selecting the device's operating mode by pressing the "MODE" button, you select the mode of visual identification of sound level and distance by pressing the "Reaction" button. The screen shown on page 27 will appear, in whose upper red field you can see the device name and the buttons for system information and help. The function and the way of using these buttons are described on page 26.
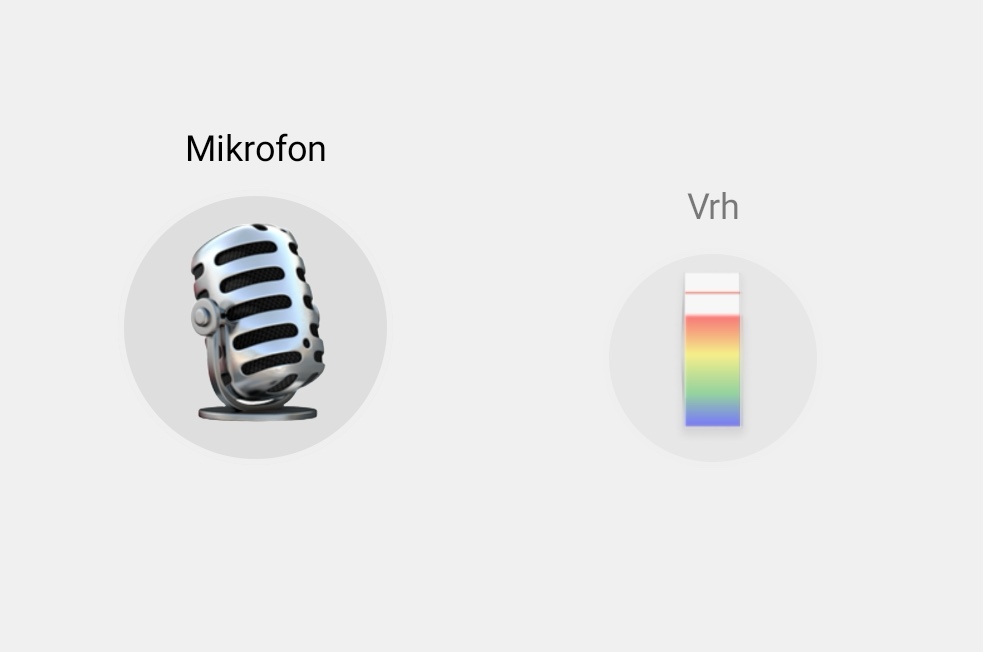
In the middle of the application screen there are images that identify the current operating mode of the device (left) and the way the light panel is displayed (right image). You can see the appearance of this part of the screen in the lower image. The left image on the screen shows the operating mode of the device, which is marked with the word "Microphone" and the corresponding symbol, as long as the distance sensor is not turned on. With these settings the light panel reacts to sound.
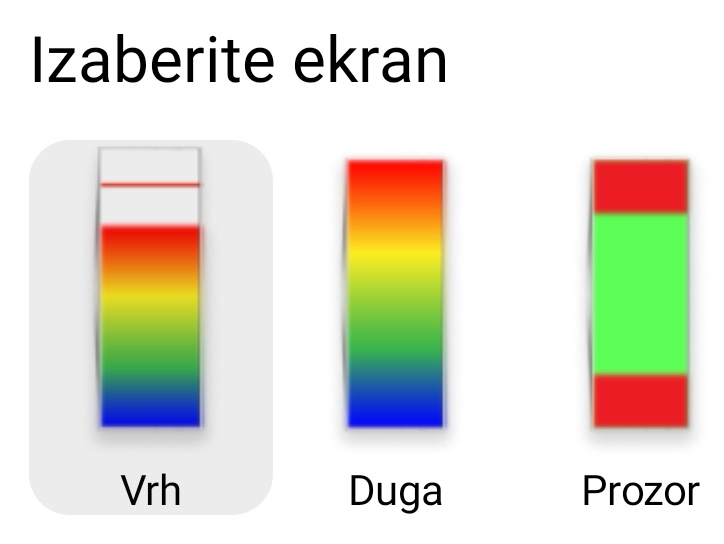
The right image located in the middle of the application screen shows the current appearance of the light panel. When you touch the image, a window opens in which you can change the appearance of the light panel according to the offered options:
"Rainbow" - using the Decay slider you can regulate the speed of decay of the light reaction to sound.
"Fields" - next to the Decay slider the Fields slider appears. With it you determine into how many multicolored fields the display of lights on the light panel will be divided.
"Peak" - Decay and two more sliders appear. Peak decay determines at what speed the peak will decay, that is, the red line that shows the maximum achieved sound intensity. Peak hold determines how long the peak will stay in place before it begins to decay down the light panel.
"Window" - the sliders Peak decay and Peak hold have the same function as in the previous case, and the term "peak" refers to the white line that shows the sound level.
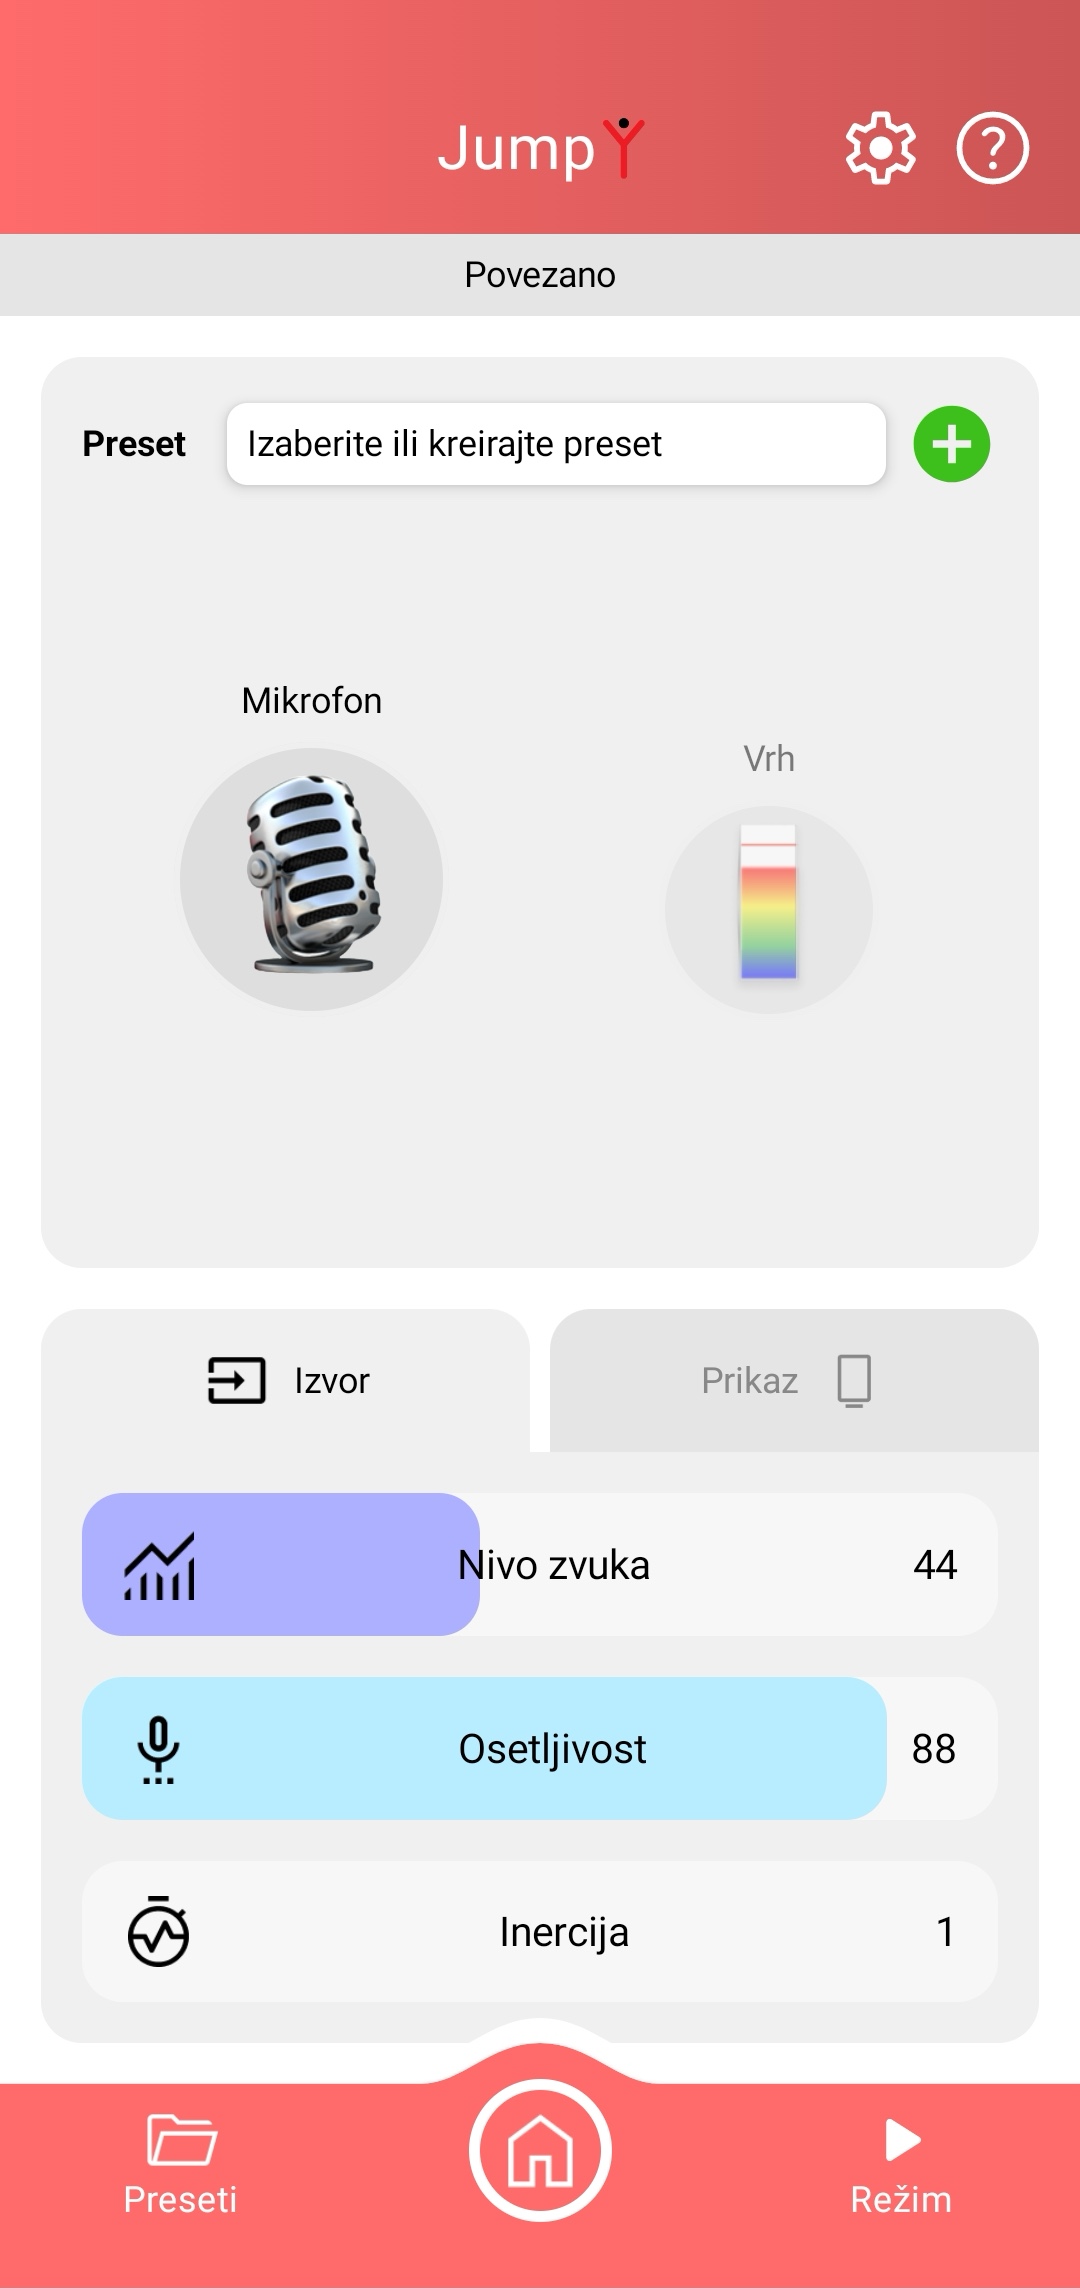
Appearance of the application screen: device connection, sensor battery, preset options, sliders and selection of the operating mode.
The adjustment of the sound level, sensitivity and inertia of the visual representation of sound is done using the sliders located in the lower half of the application screen, in the "Source" section.
Sound level is the threshold that the sound level must cross in order to cause a light reaction. Sounds below this level are ignored. If necessary, adjust it according to the noise level in your space so that the light panel does not turn on when no one is speaking.
Sensitivity is the system's sensitivity to a change in sound level. If you change it toward higher values, the system becomes more sensitive, and it can be triggered more easily. By moving the slider toward lower values, a higher sound level is needed for the device to be triggered, that is, for the lights to turn on.
Inertia represents the reaction speed of the light panel to the sound stimulus.
- Reaction to the distance sensor
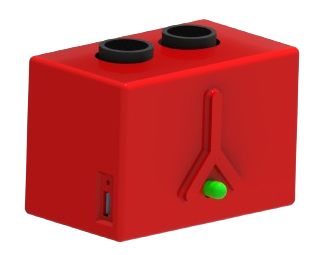
Distance sensor
When the distance sensor is turned on, the light panel stops reacting to sound and reacts only to the change in distance between the sensor and the object, and on the application screen "Distance" is written and the corresponding symbol is shown, and in the lower part of the screen the slider Range appears. With it you regulate the sensitivity of the light display to the change in distance of an obstacle from the distance sensor. The smaller the value on the slider, the faster the lights on the panel will react and the more they will fill the screen.
Also, you can use the distance sensor for the games Reflex, Same/different and Rhythmic pattern as well.
When the distance sensor is turned off, the application and all its functions, as well as the light panel, automatically return to the "Microphone" mode, that is, they react to sound again.
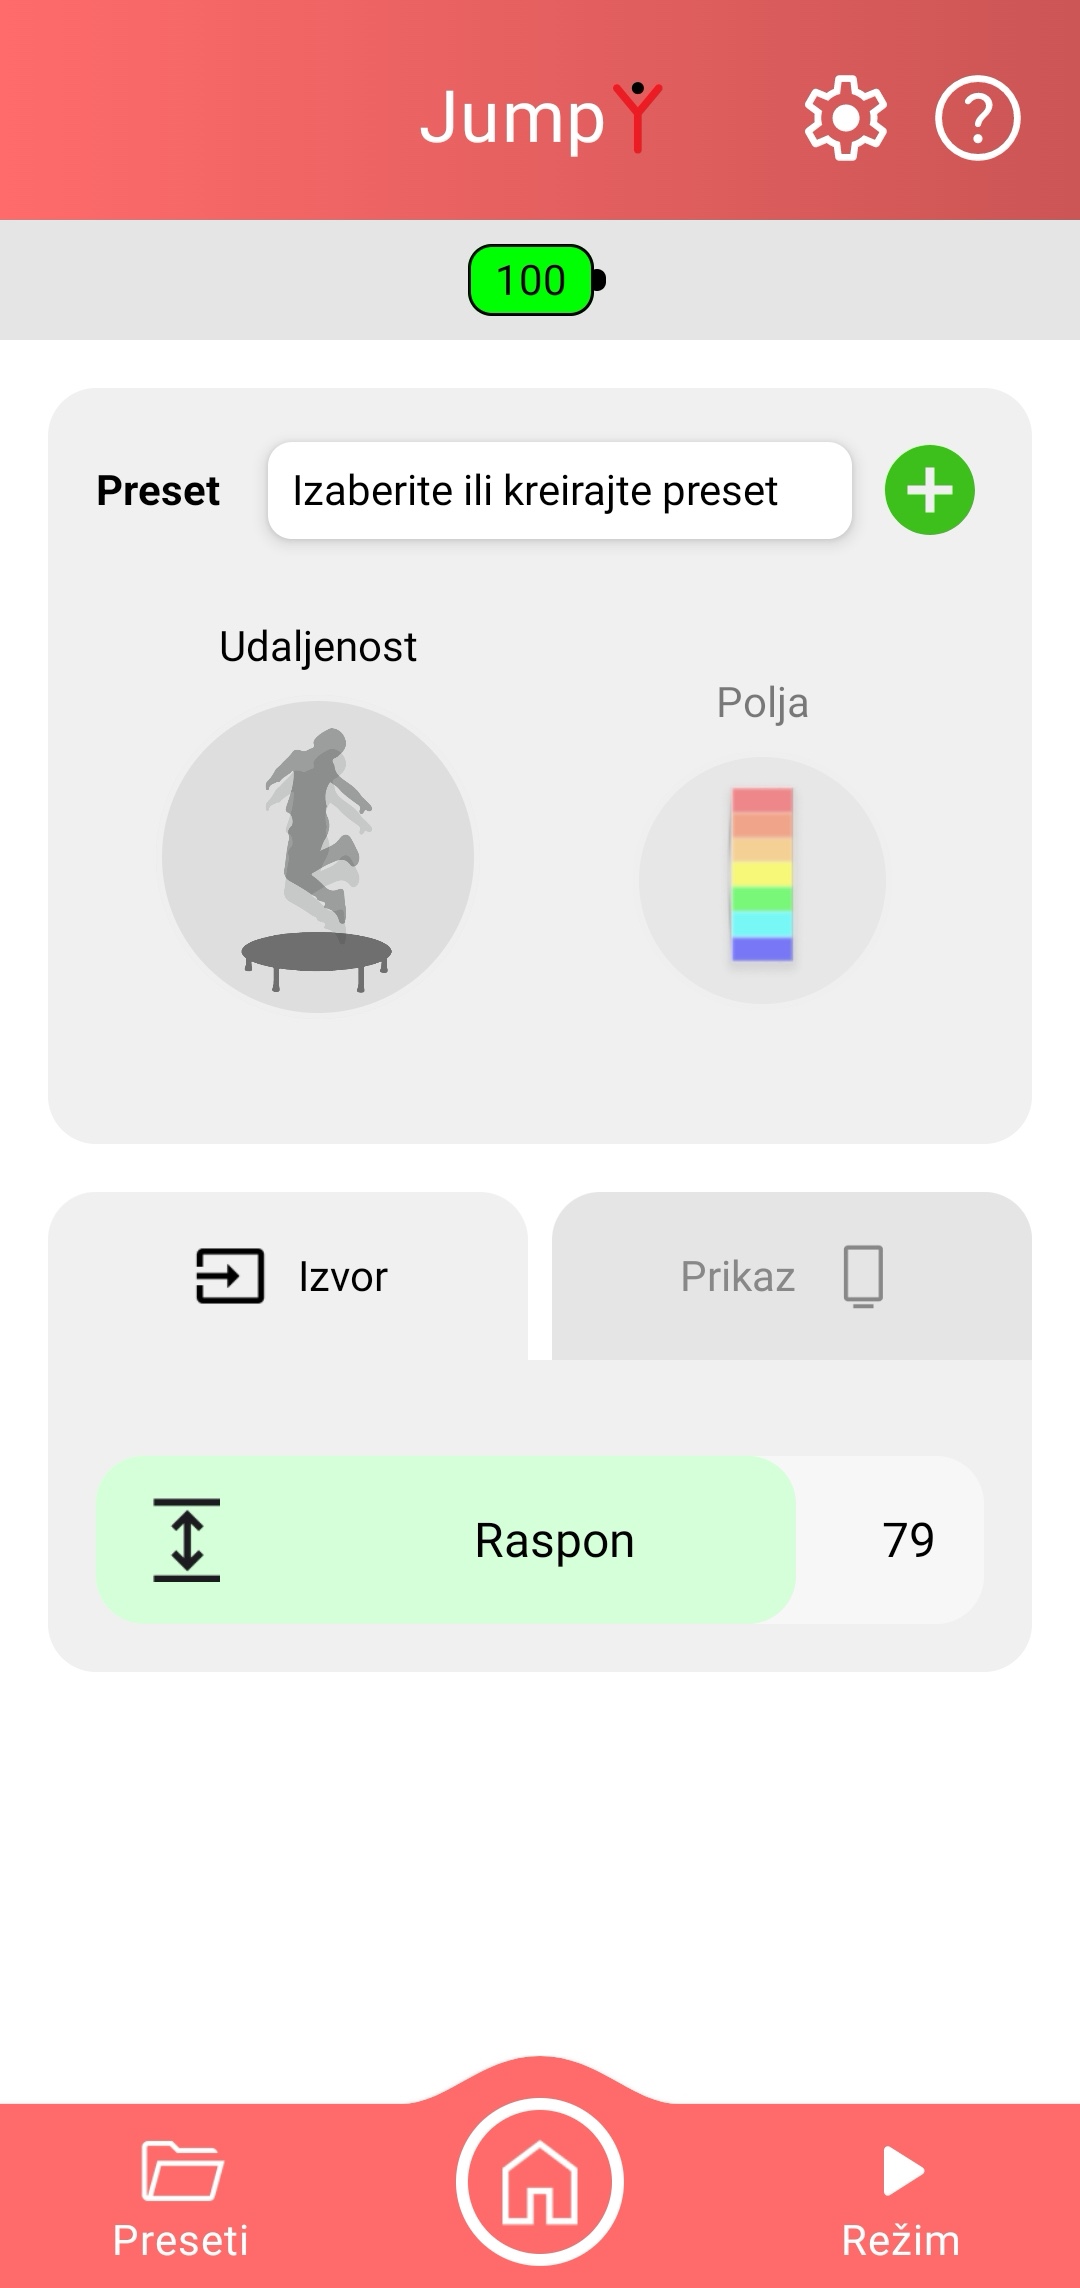
Screen view after turning on the distance sensor.
Turn on the distance sensor after you have placed it at the maximum distance from the object whose distance you want to measure. At the moment of turning on, the sensor measures the initial distance, and all distance changes are displayed in relation to it.
Place it so that the side of the sensor on which the round openings are located is directed toward the object whose distance is being measured. For example: if you place the distance sensor under a trampoline, the two round openings located on it should be directed upward, as shown in the image.
On the application screen you can see the charge status of the battery located in the distance sensor. Do not wait for the battery to fully discharge, but charge it by connecting the USB-C cable to the place provided for it, which is marked with an arrow in the lower image.
You can always return to the home screen of the "VoiceToys" application by pressing the button with the house image, located in the middle of the lower red field of the application screen.
Snoezelen
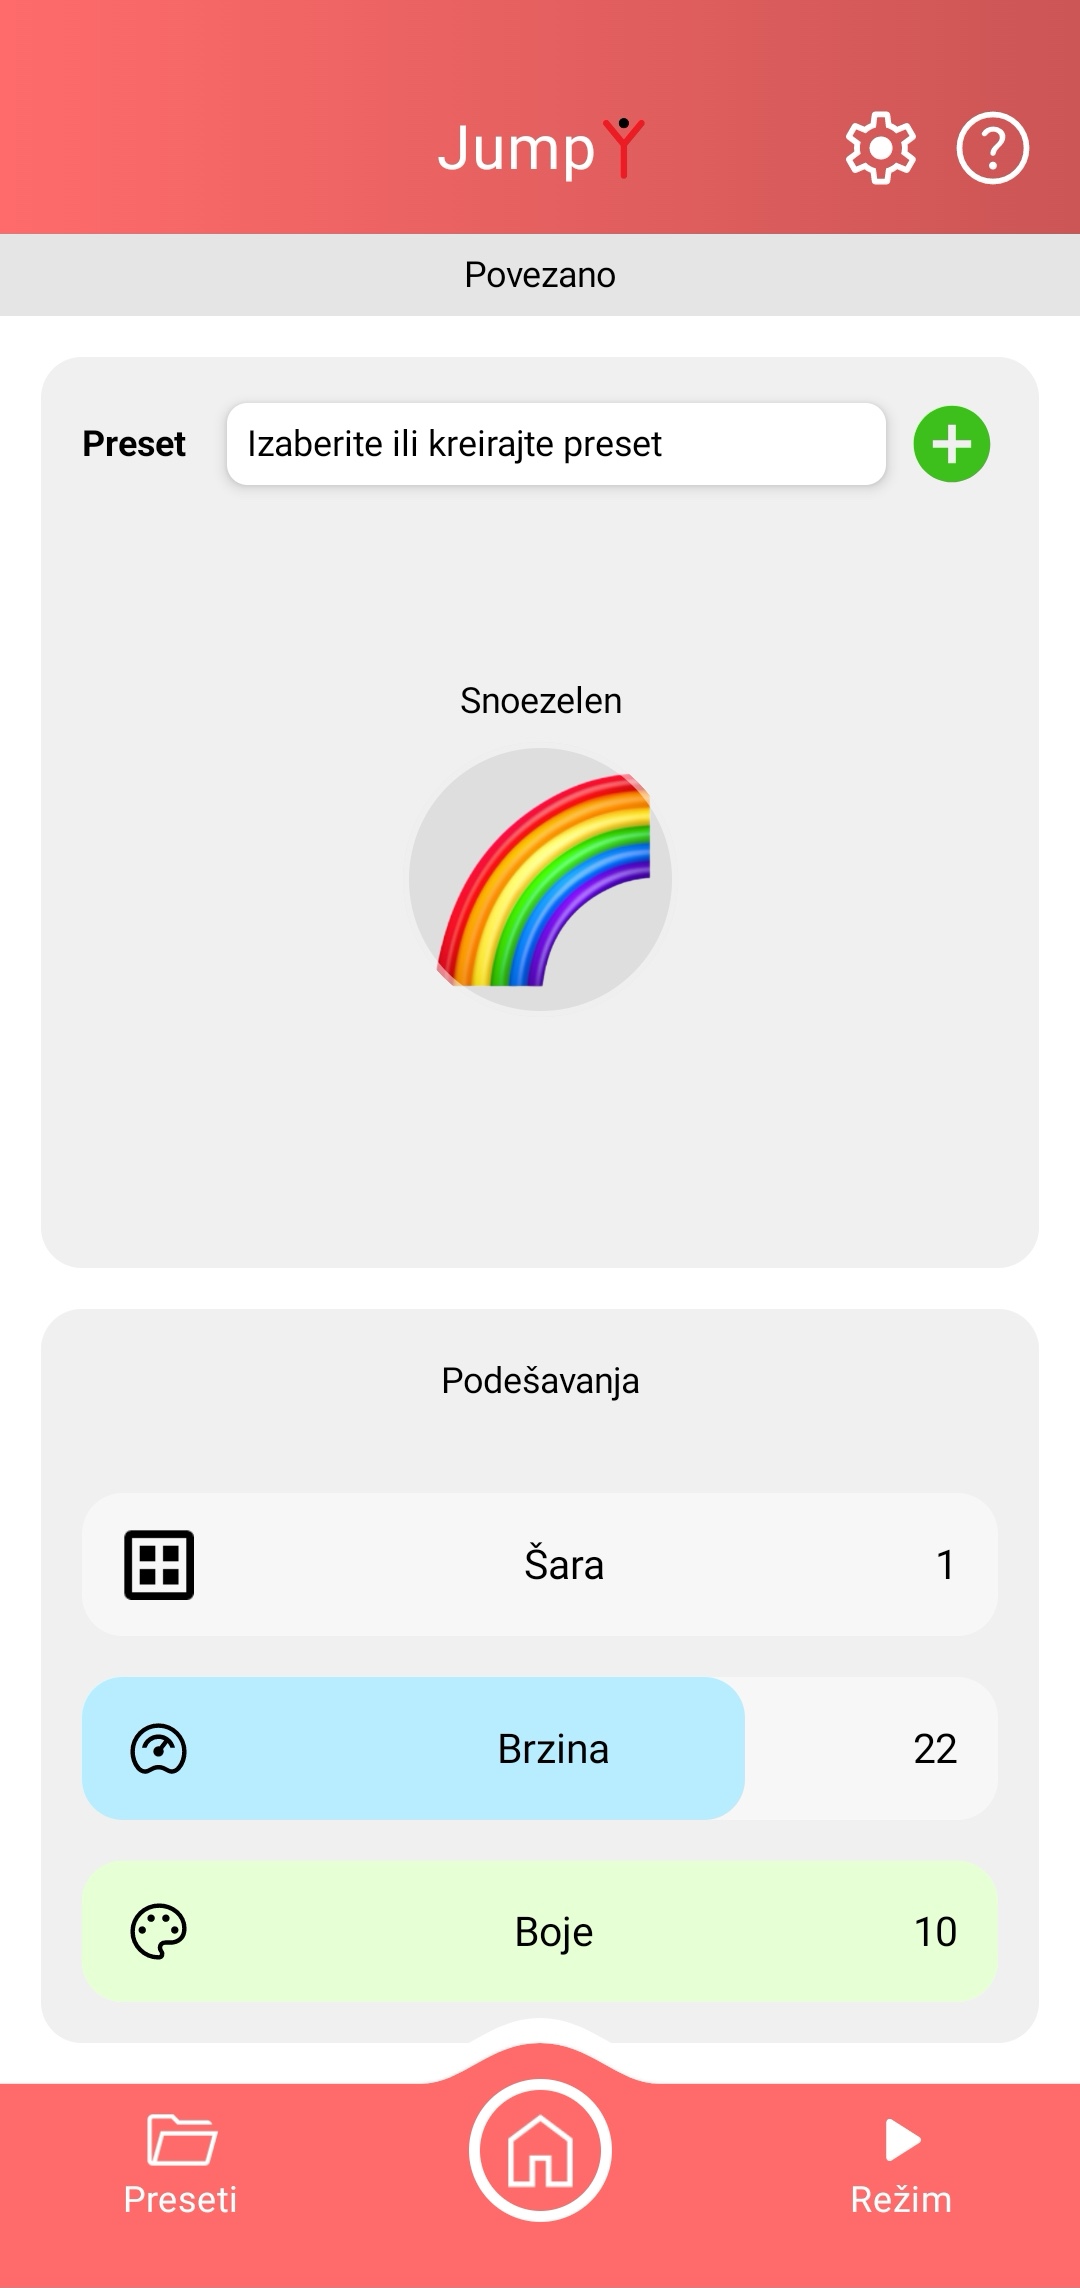
Screen view after activating the Snoezelen mode.
After entering the menu for selecting the device's operating mode by pressing the "MODE" button, you select the Snoezelen mode of soothing light by pressing the "Snoezelen" button. The screen shown in the image on the right will appear, in whose upper red field you can see the device name and the buttons for system information and help. The function and the way of using these buttons are described on page 26.
The adjustment of the color combination, speed and number of colors that are displayed is done using the sliders located in the lower half of the application screen, in the "Settings" section.
Pattern represents the selection of the way of displaying the soothing light, that is, the way of displaying the color combination. There are 8 ways of displaying the colors, which you select using this slider.
Speed refers to the speed of the change of lights in the currently selected display of soothing light. You can speed it up or slow it down.
Colors indicates the number of colors that will take part in the selected display of soothing light.
Light intensity adjusts the brightness of the screen; you access this function via the gear button in the upper red field.
If you change the parameters of sound level, sensitivity or color, you can save your settings and access them in the way described on page 19.
You can always return to the home screen of the "VoiceToys" application by pressing the button with the house image, located in the middle of the lower red field of the application screen.
Reflex
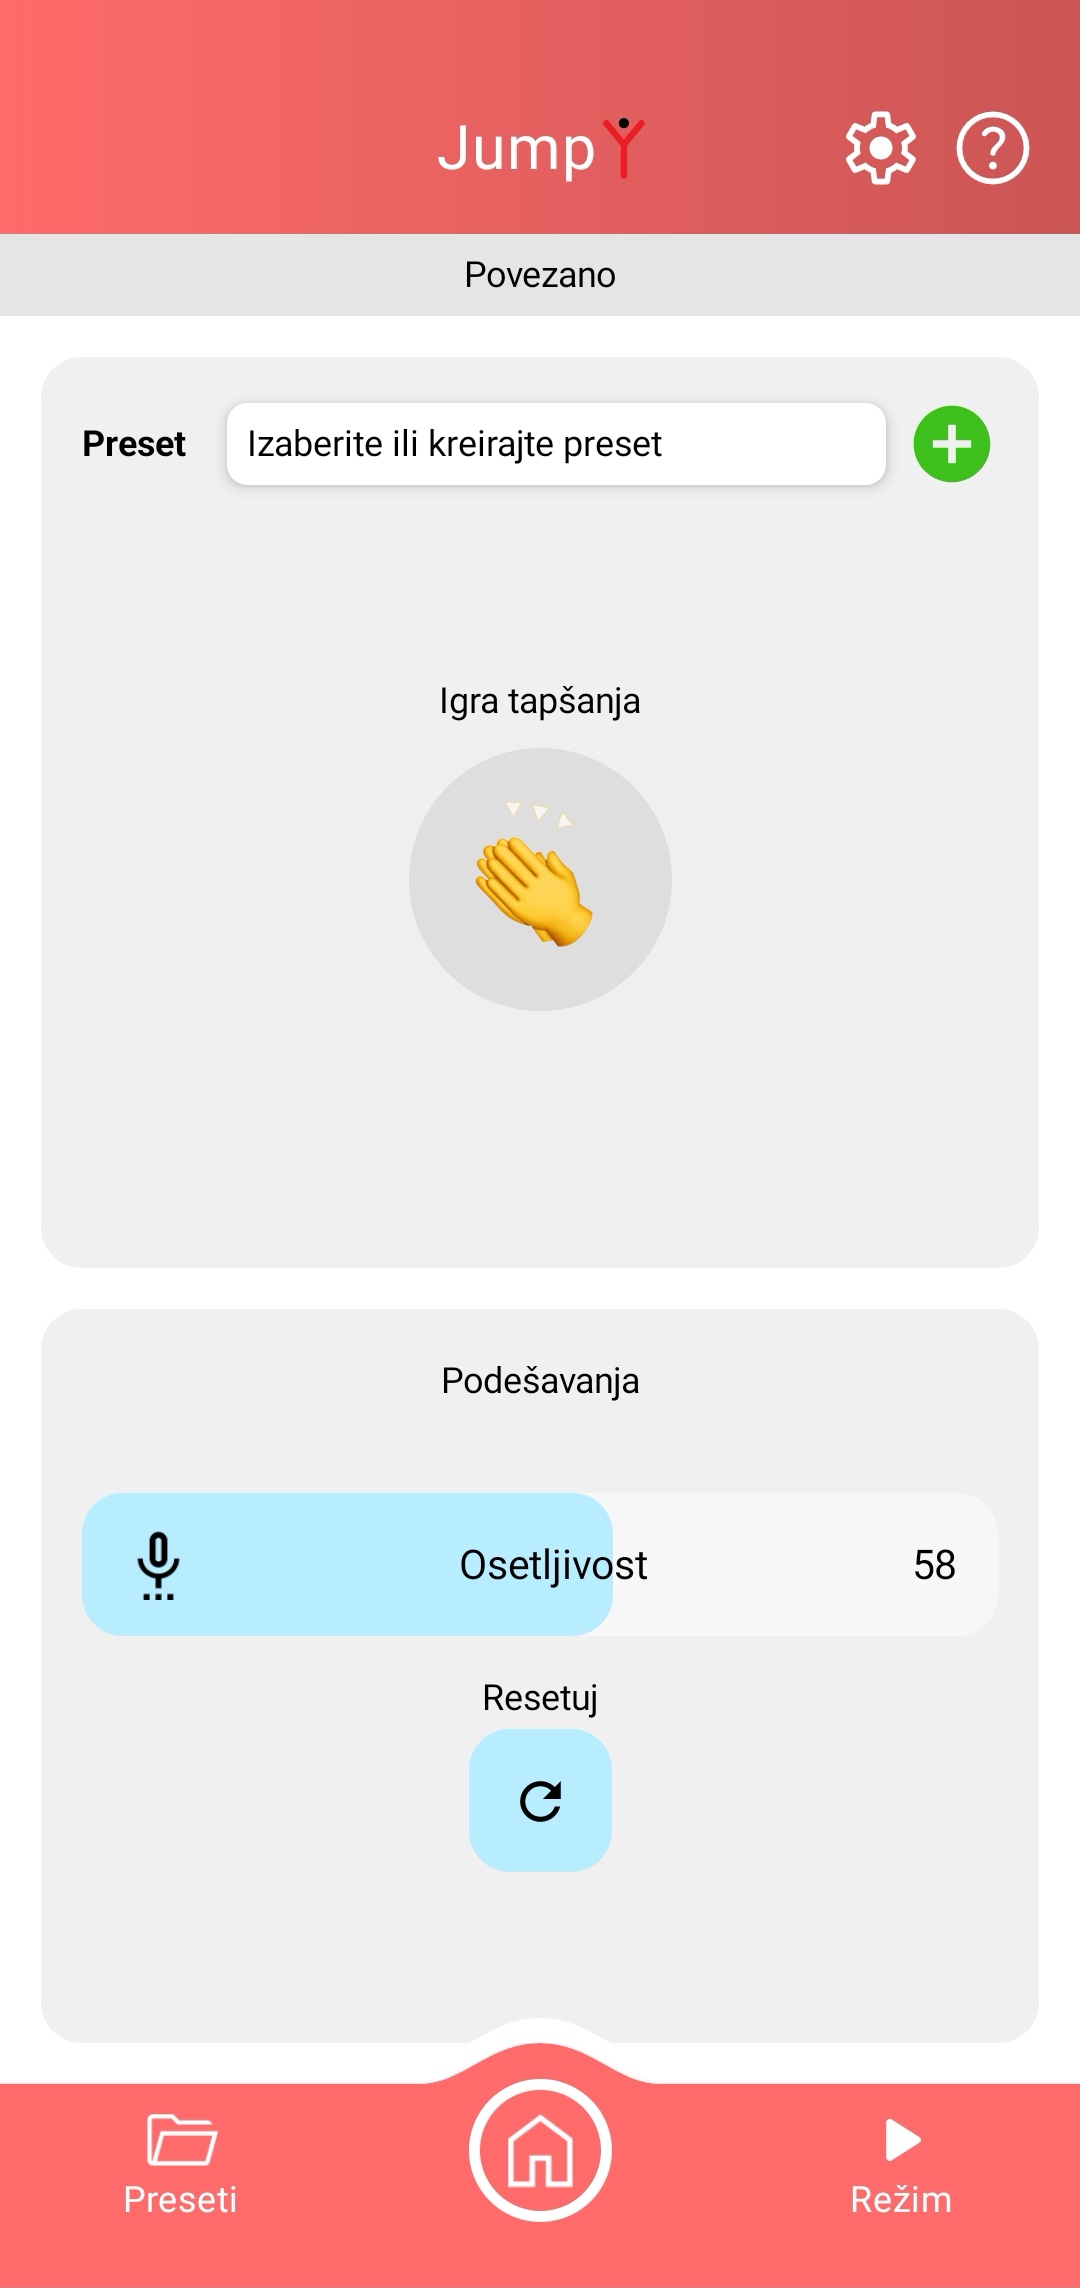
Screen view after activating the Reflex mode
After entering the menu for selecting the device's operating mode by pressing the "MODE" button, you select the Clapping game mode by pressing the "Reflex" button. The screen shown in the image on the right will appear, in whose upper red field you can see the device name and the buttons for system information and help. The function and the way of using these buttons are described on page 26.
The adjustment of the device's sensitivity to sound is done using the sliders located in the lower half of the application screen, in the "Settings" section.
Sensitivity represents the system's sensitivity to a sudden jump in the sound level. This sudden jump is caused by producing some loud, sharp sound - clapping, stamping a foot on the floor, a pencil on the table, a ball on the floor, a strike on a drum, etc. You can find more information about the way of playing by pressing the question mark symbol, in the right part of the upper red field.
Reset is the button marked with the symbol ↻. By pressing this button you return the game to the starting position.
Light intensity adjusts the brightness of the screen; you access this function via the gear button in the upper red field.
If you change the parameters of sound level, sensitivity or color, you can save your settings and access them in the way described on page 19.
You can always return to the home screen of the "VoiceToys" application by pressing the button with the house image, located in the middle of the lower red field of the application screen.
Differences
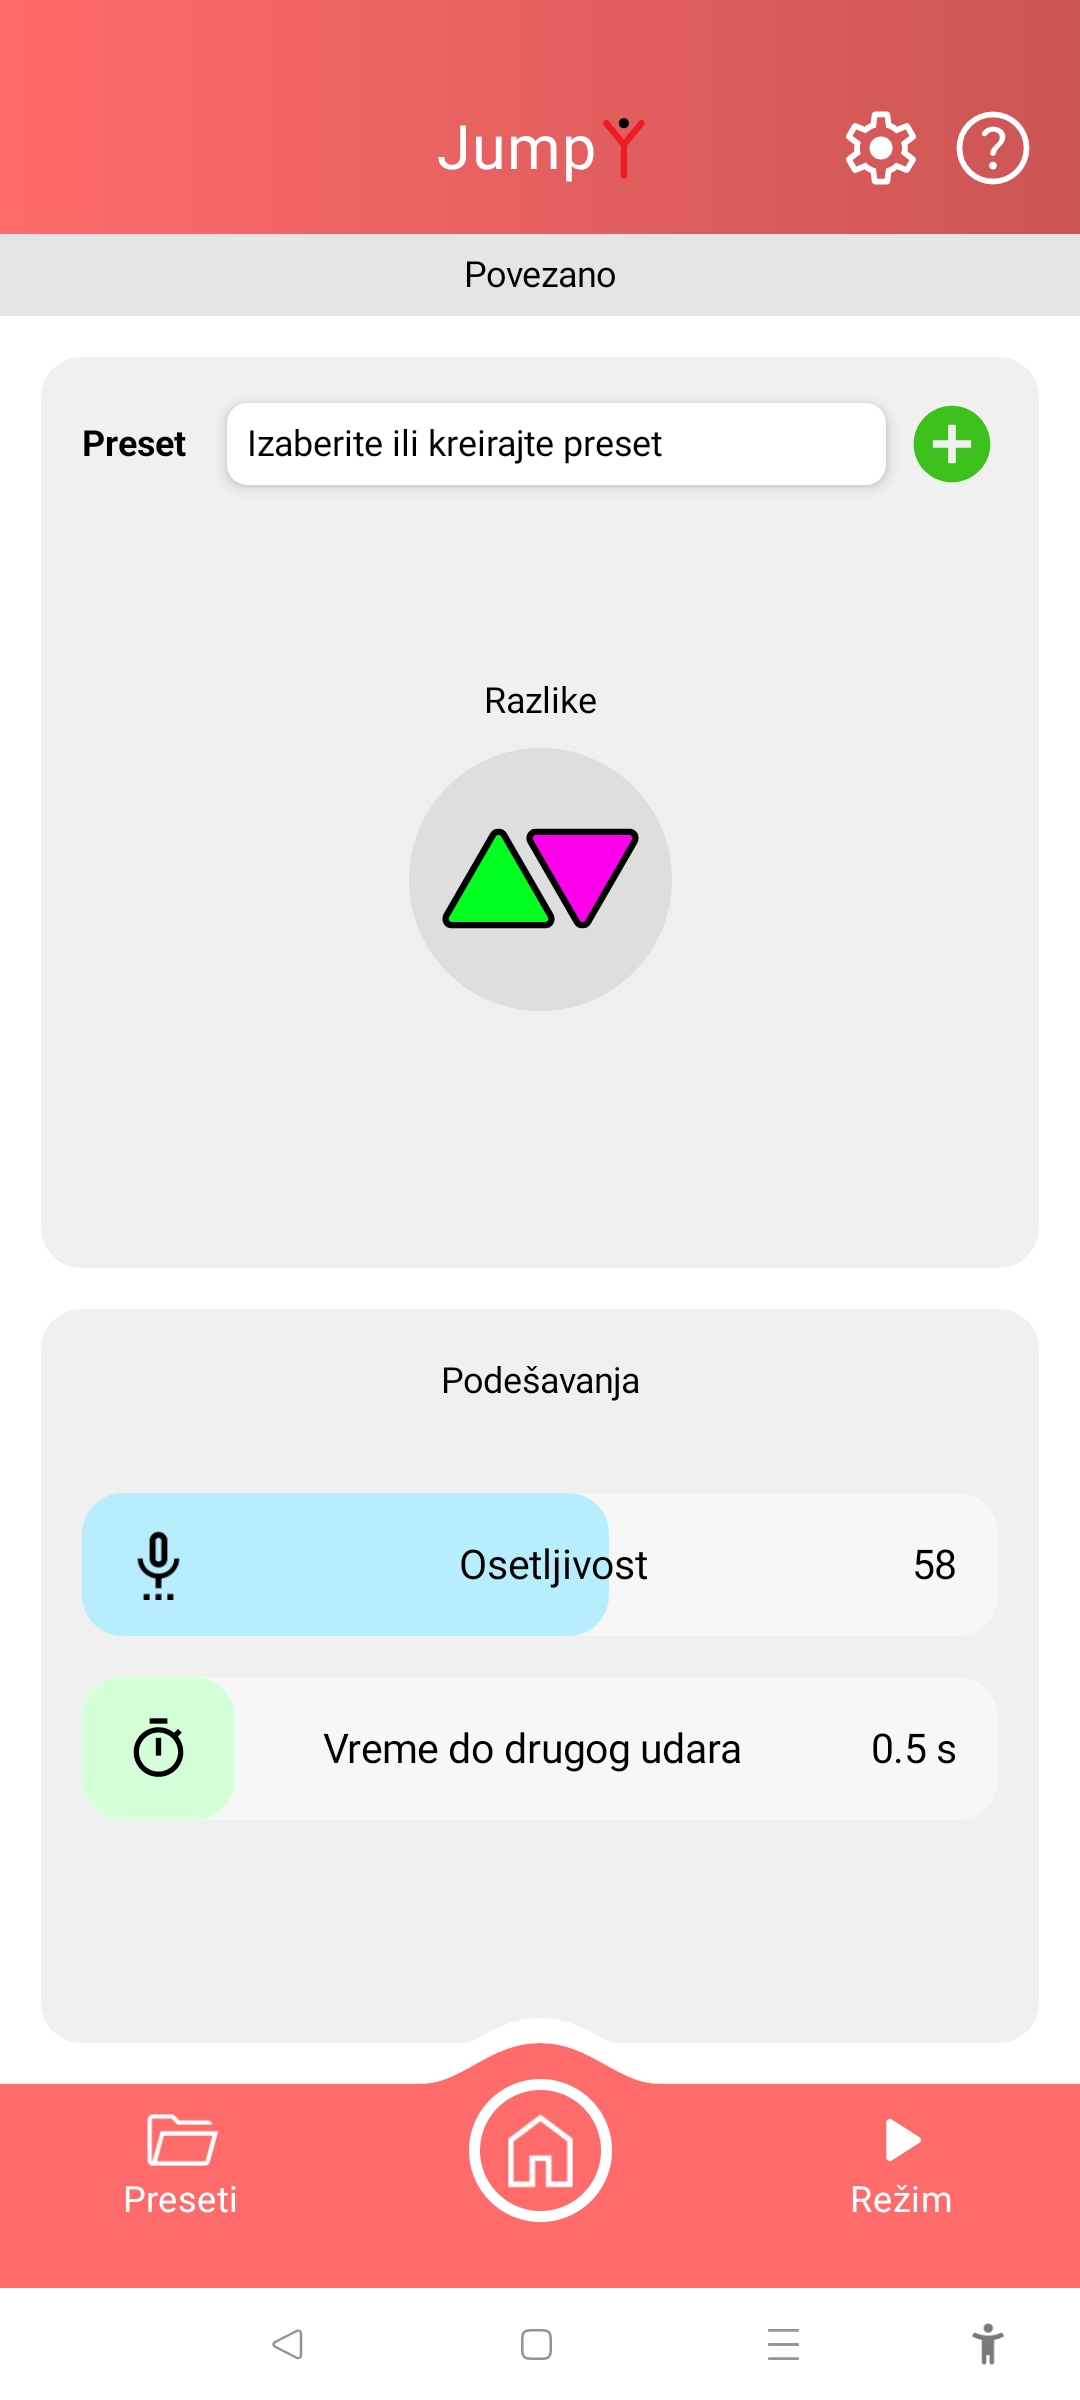
Screen view after activating the Differences mode.
After entering the menu for selecting the device's operating mode by pressing the "MODE" button, you select the Differences mode - exercise in recognizing colors by pressing the "Differences" button. The screen shown in the image on the right will appear, in whose upper red field you can see the device name and the buttons for system information and help. The function and the way of using these buttons are described on page 26.
The adjustment of the device's sensitivity to sound is done using the sliders located in the lower half of the application screen, in the "Settings" section. Sensitivity represents the system's sensitivity to a sudden jump in the sound level. This sudden jump is caused by producing some loud, sharp sound - clapping, stamping a foot on the floor, a pencil on the table, a ball on the floor, a strike on a drum, etc. You can find more information about the way of playing by pressing the question mark symbol, in the right part of the upper red field.
Time to second strike determines the maximum time interval between two strikes that the system registers as a double strike.
Light intensity adjusts the brightness of the screen; you access this function via the gear button in the upper red field.
If you change the parameters of sound level, sensitivity or color, you can save your settings and access them in the way described on page 19.
You can always return to the home screen of the "VoiceToys" application by pressing the button with the house image, located in the middle of the lower red field of the application screen.
Rhythmic pattern
After entering the menu for selecting the device's operating mode by pressing the "MODE" button, you select the Recognizing and repeating rhythmic patterns mode by pressing the "Rhythmic pattern" button. The screen shown in the image on the right will appear, in whose upper red field you can see the device name and the buttons for system information and help. The function and the way of using these buttons are described on page 26.
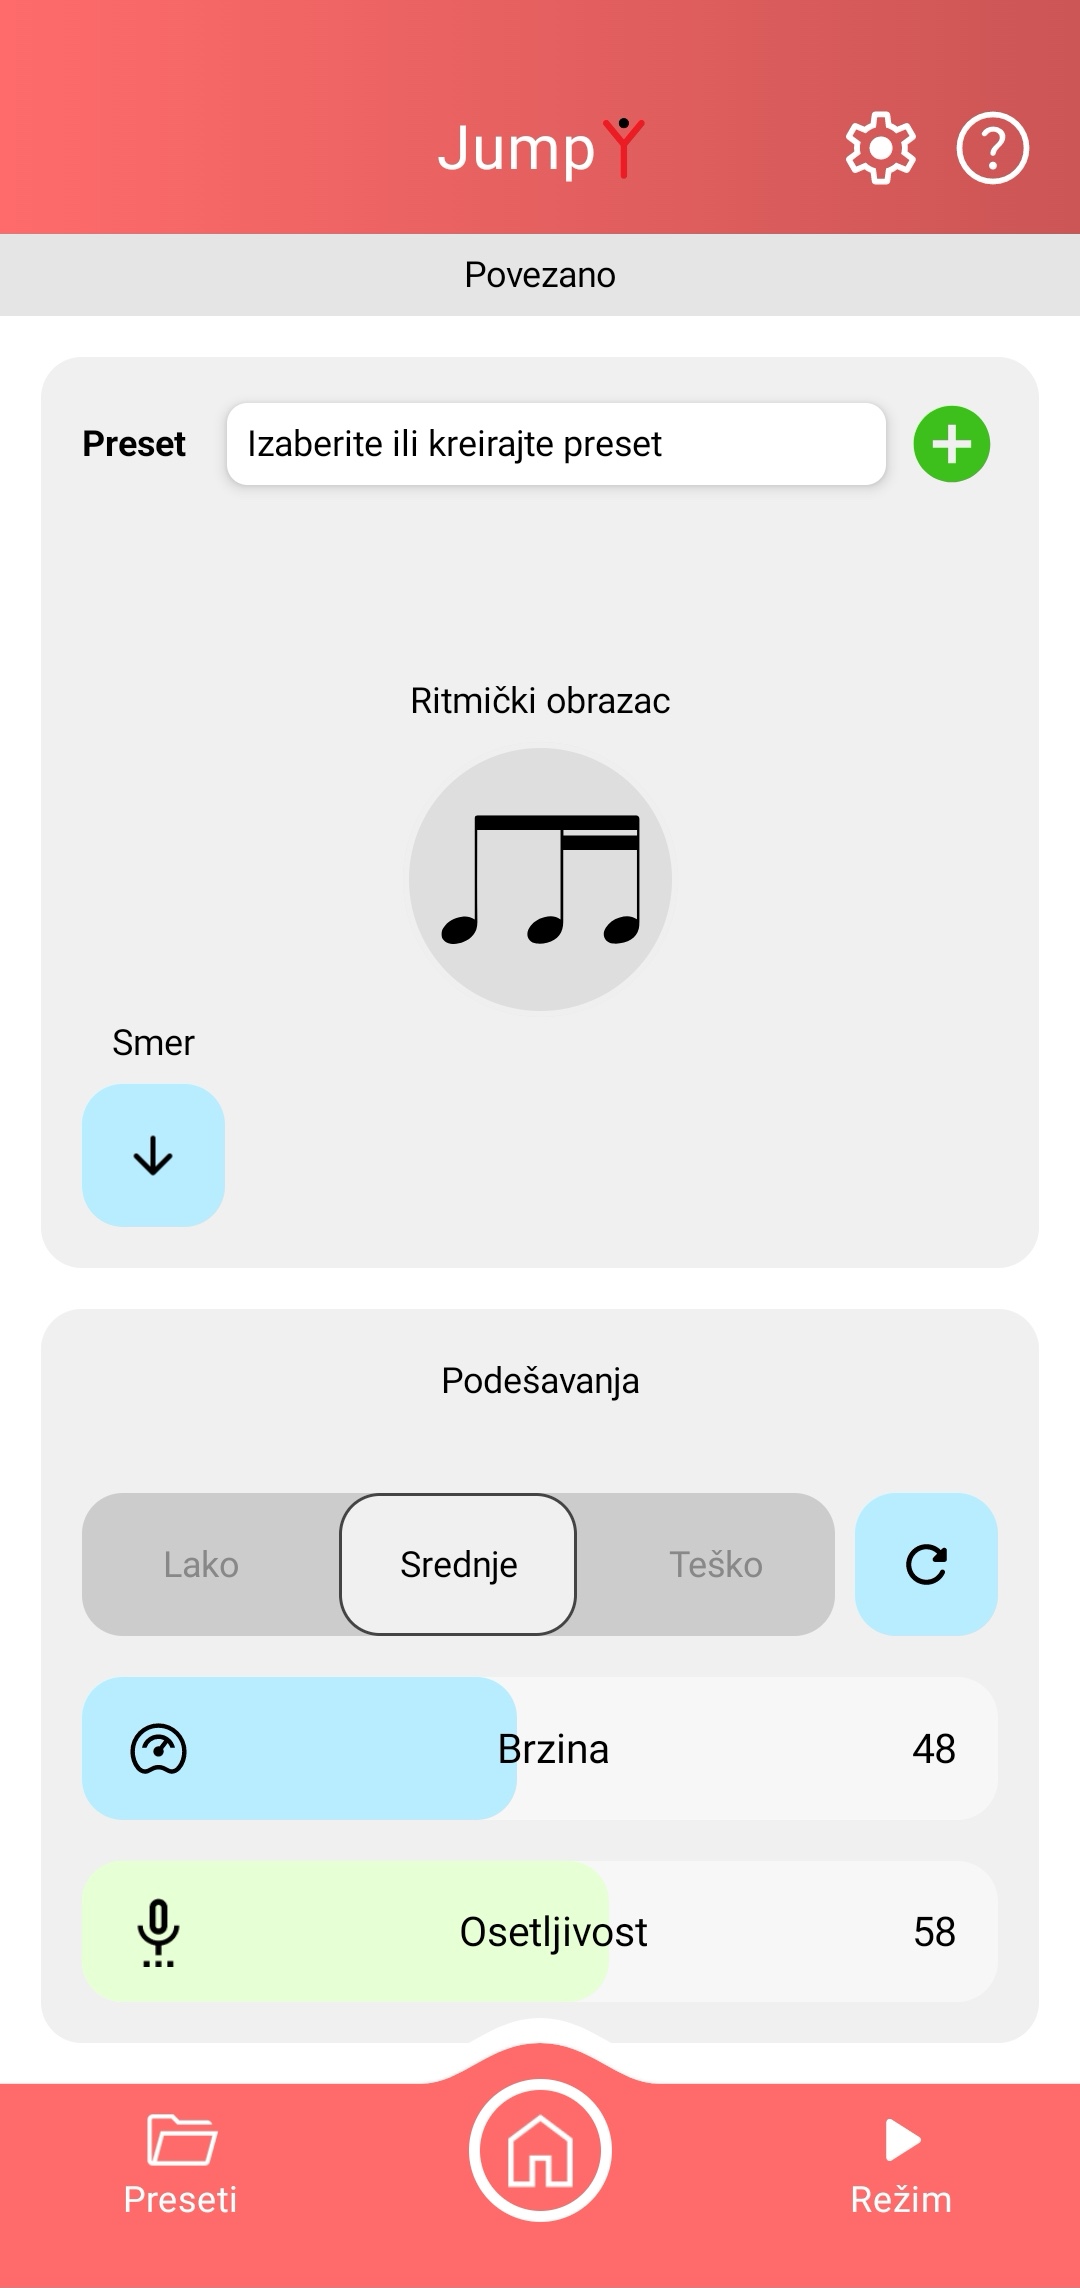
Screen view after activating the Rhythmic pattern mode.
In the middle part of the screen there is a Direction button that determines in which direction the white line will move.
The adjustment of the device is done using the sliders located in the lower half of the application screen, in the "Settings" section.
On the slider with the markings Easy-Medium-Hard we select the width of the lines, by which we make the task harder or easier for the player. Next to this slider there is a button with the marking ↻, by activating which the game is reset and returned to the beginning.
Speed represents the speed of movement of the white line. By adjusting it we make the task harder or easier for the player.
Sensitivity represents the system's sensitivity to a sudden jump in the sound level. This sudden jump is caused by producing some loud, sharp sound - clapping, stamping a foot on the floor, a pencil on the table, a ball on the floor, a strike on a drum, etc. You can find more information about the way of playing by pressing the question mark symbol, in the right part of the upper red field.
Light intensity adjusts the brightness of the screen; you access this function via the gear button in the upper red field.
If you change any of the parameters, you can save your settings and access them in the way described on page 19.
You can always return to the home screen of the "VoiceToys" application by pressing the button with the house image, located in the middle of the lower red field of the application screen.
Phonetics
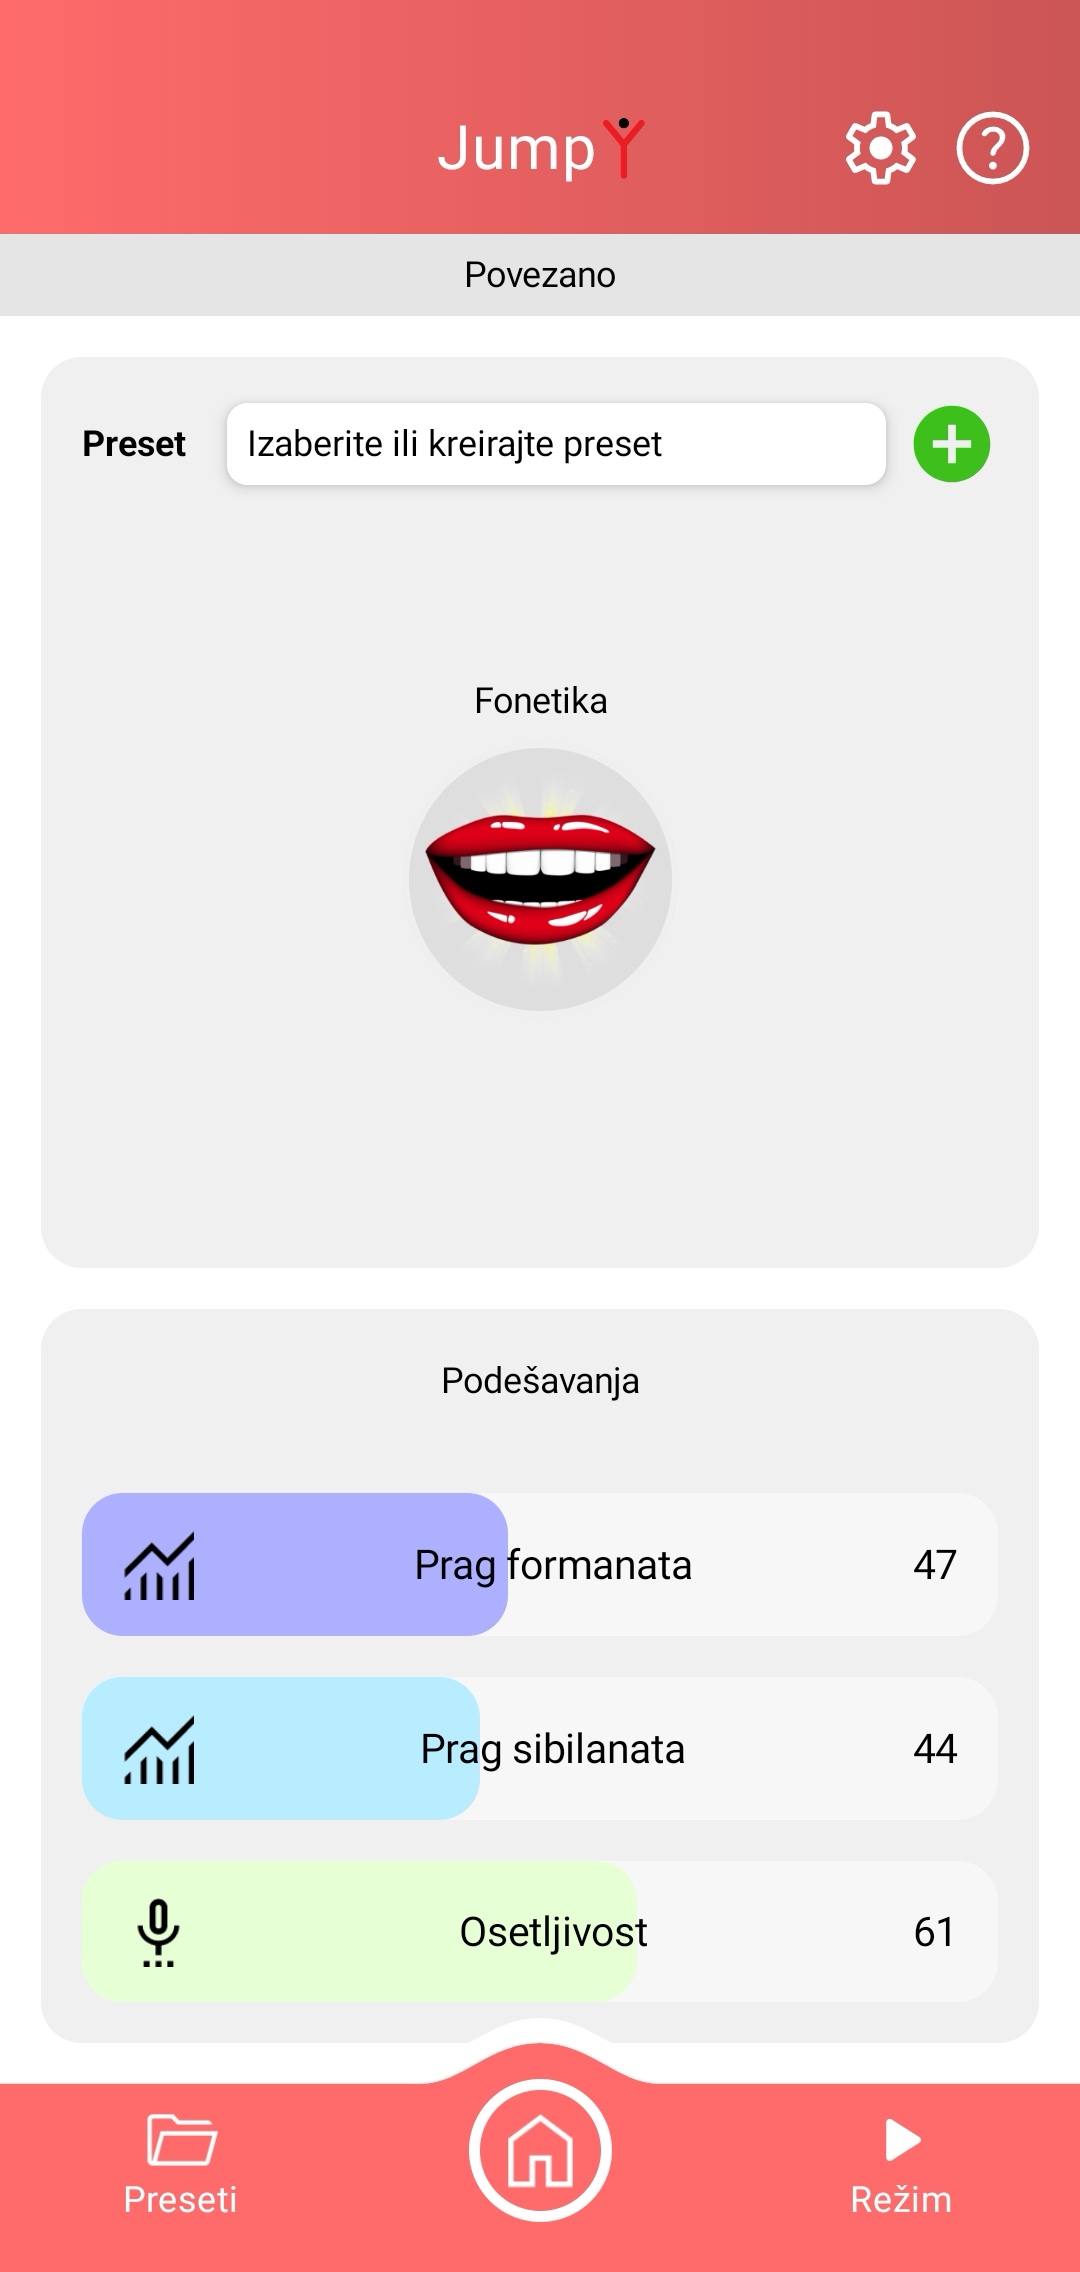
Screen view after activating the Phonetics mode.
After entering the menu for selecting the device's operating mode by pressing the "MODE" button, you select the Phonetics mode - practicing formants and sibilants by pressing the "Phonetics" button. The screen shown in the image on the right will appear, in whose upper red field you can see the device name and the buttons for system information and help. The function and the way of using these buttons are described on page 26.
In the middle part of the screen there is an image that shows which operating mode the device is in.
The adjustment of the device is done using the sliders located in the lower half of the application screen, in the "Settings" section.
On the slider with the marking Formant threshold we select the threshold that the sound level must cross in order to cause a light reaction. Sounds below this level are ignored.
On the slider with the marking Sibilant threshold we select the threshold that the sound level must cross in order to cause a light reaction. Sounds below this level are ignored.
Sensitivity is the system's sensitivity to a change in sound level. If you change it toward higher values, the system becomes more sensitive, and it can be triggered more easily. By moving the slider toward lower values, a higher sound level is needed for the device to be triggered, that is, for the lights to turn on.
Light intensity adjusts the brightness of the screen; you access this function via the gear button in the upper red field.
If you change any of the parameters, you can save your settings and access them in the way described on page 19.
You can always return to the home screen of the "VoiceToys" application by pressing the button with the house image, located in the middle of the lower red field of the application screen.