Device specifications
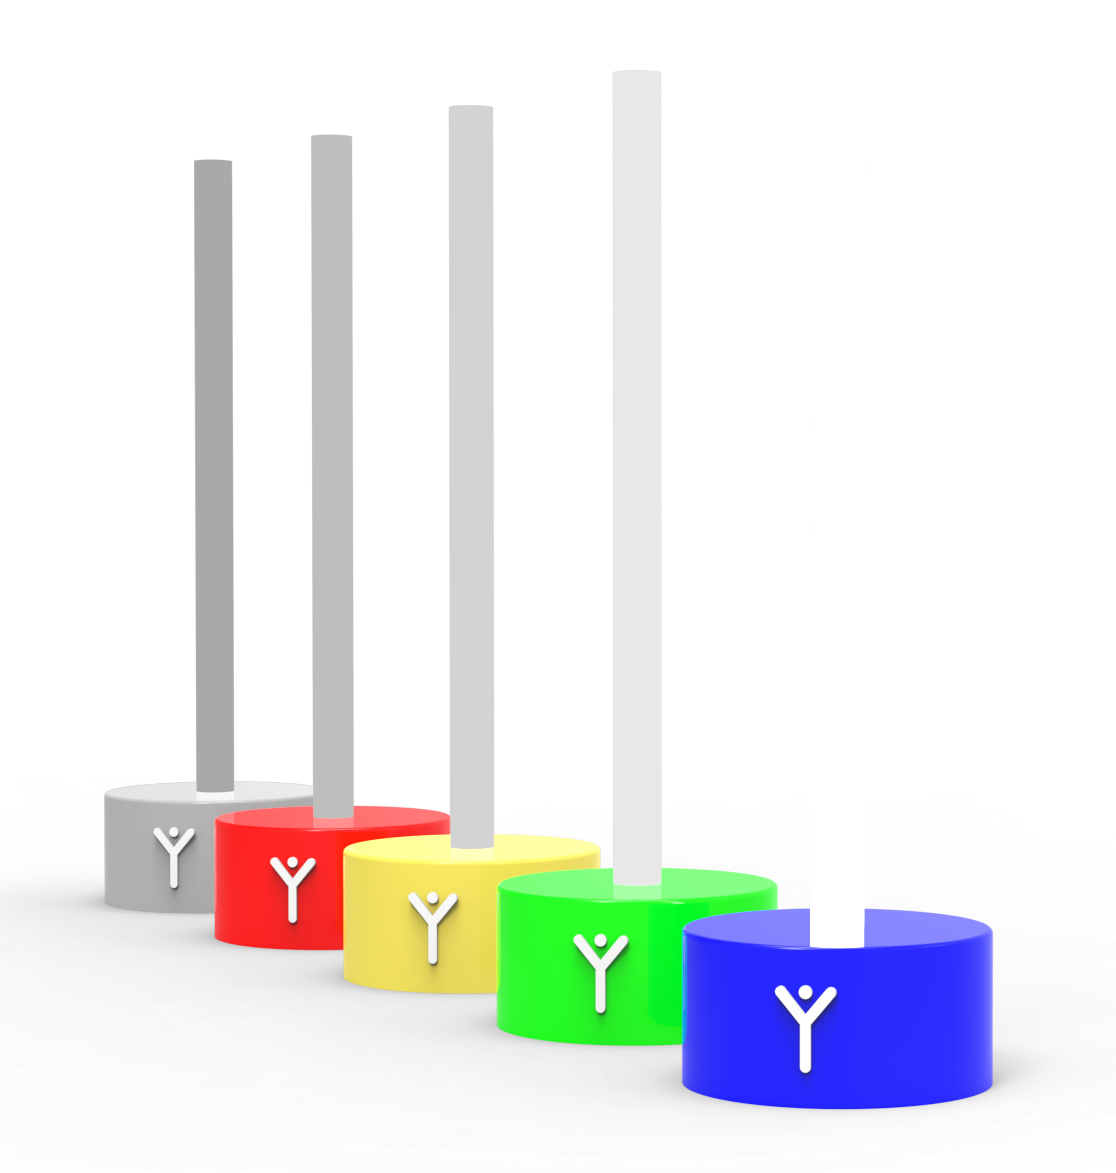
Arrangement of the SpreadY columns by color
| Power supply | DC, 5V, 3A |
|---|---|
| Connector | USB-C |
| Dimensions | Diameter 121mm Height 340 mm |
| Battery | Li-Ion 18650 |
| Networks | Wi-Fi, Bluetooth |
| Housing | PET-G Acrylic rod 20mm diameter, 40cm length |
System description and safety notes
SpreadY is a multifunctional system consisting of 5 glowing columns. They are intended for the visual identification of sound spreading, as a memory game, that is, for learning addition, and for the analysis and synthesis of words and sentences by turning on individual columns. The selection of functions and detailed settings of the device are made via the VoiceToys mobile application.
Putting the system into operation
The SpreadY columns are used by arranging them in the space so that the blue column is closest to the sound source. The other columns are lined up in the following order: green, yellow, red, gray. The columns are put into operation by setting the switch on the underside of the device to position 1.
After turning on, the logo on the housing begins to glow. The devices connect automatically, without any additional setup, and react to sound immediately after turning on. The blue column is the main one, the microphone is in it, it sends the signal to the others and it connects to the mobile application.
It is necessary that the blue column is active so that the others can function and so that the application connects!
If the logo changes color to yellow, it means that the battery has weakened, and if it starts to flash red, the battery is at a critically low level and should be charged immediately.
You can also monitor the battery status using the mobile application. On the underside of the blue device there are also three openings for the entry of sound into the interior of the device. Do not cover them and do not place the device on a soft surface that can absorb sound!
Charging the device battery
The device contains a lithium-ion battery that is charged with a voltage of 5V/3A, using the USB-C connector on the underside of the device. After connecting the voltage, the logo indicates charging by emitting red, yellow or green color, in accordance with the battery status. When it glows constantly green, the charging process is complete.
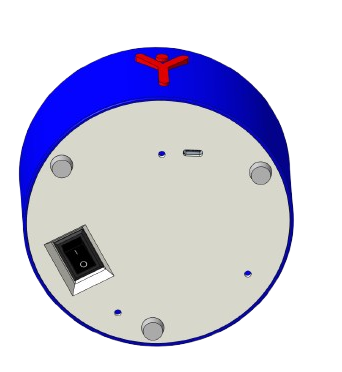
Underside of the device, the USB-C charging connector and the switch.
Mobile application functions for the SpreadY device
Selecting the operating mode and fine-tuning the device are done using the VoiceToys application. Before launching the mobile application, be sure to turn on the blue column, because it contains the bluetooth receiver through which the device communicates with the phone. The devices connect automatically, without any additional setup, and react to sound immediately after turning on.
After turning on the device, on the application's home screen select the option SpreadY when its symbol turns green. If the connection is successful, the logo of the blue column will blink twice, and the mobile application will take on the device's settings and display the values according to which it is currently reacting.
In the upper blue field of the application screen you can see the device name and the buttons for system information and help.
By pressing the gear symbol in the upper blue field you will access the screen with device information, where you can see whether your device is updated, that is, whether the latest software version has been loaded into it.
By pressing any part of the screen shaded gray you return to the screen for the SpreadY device.
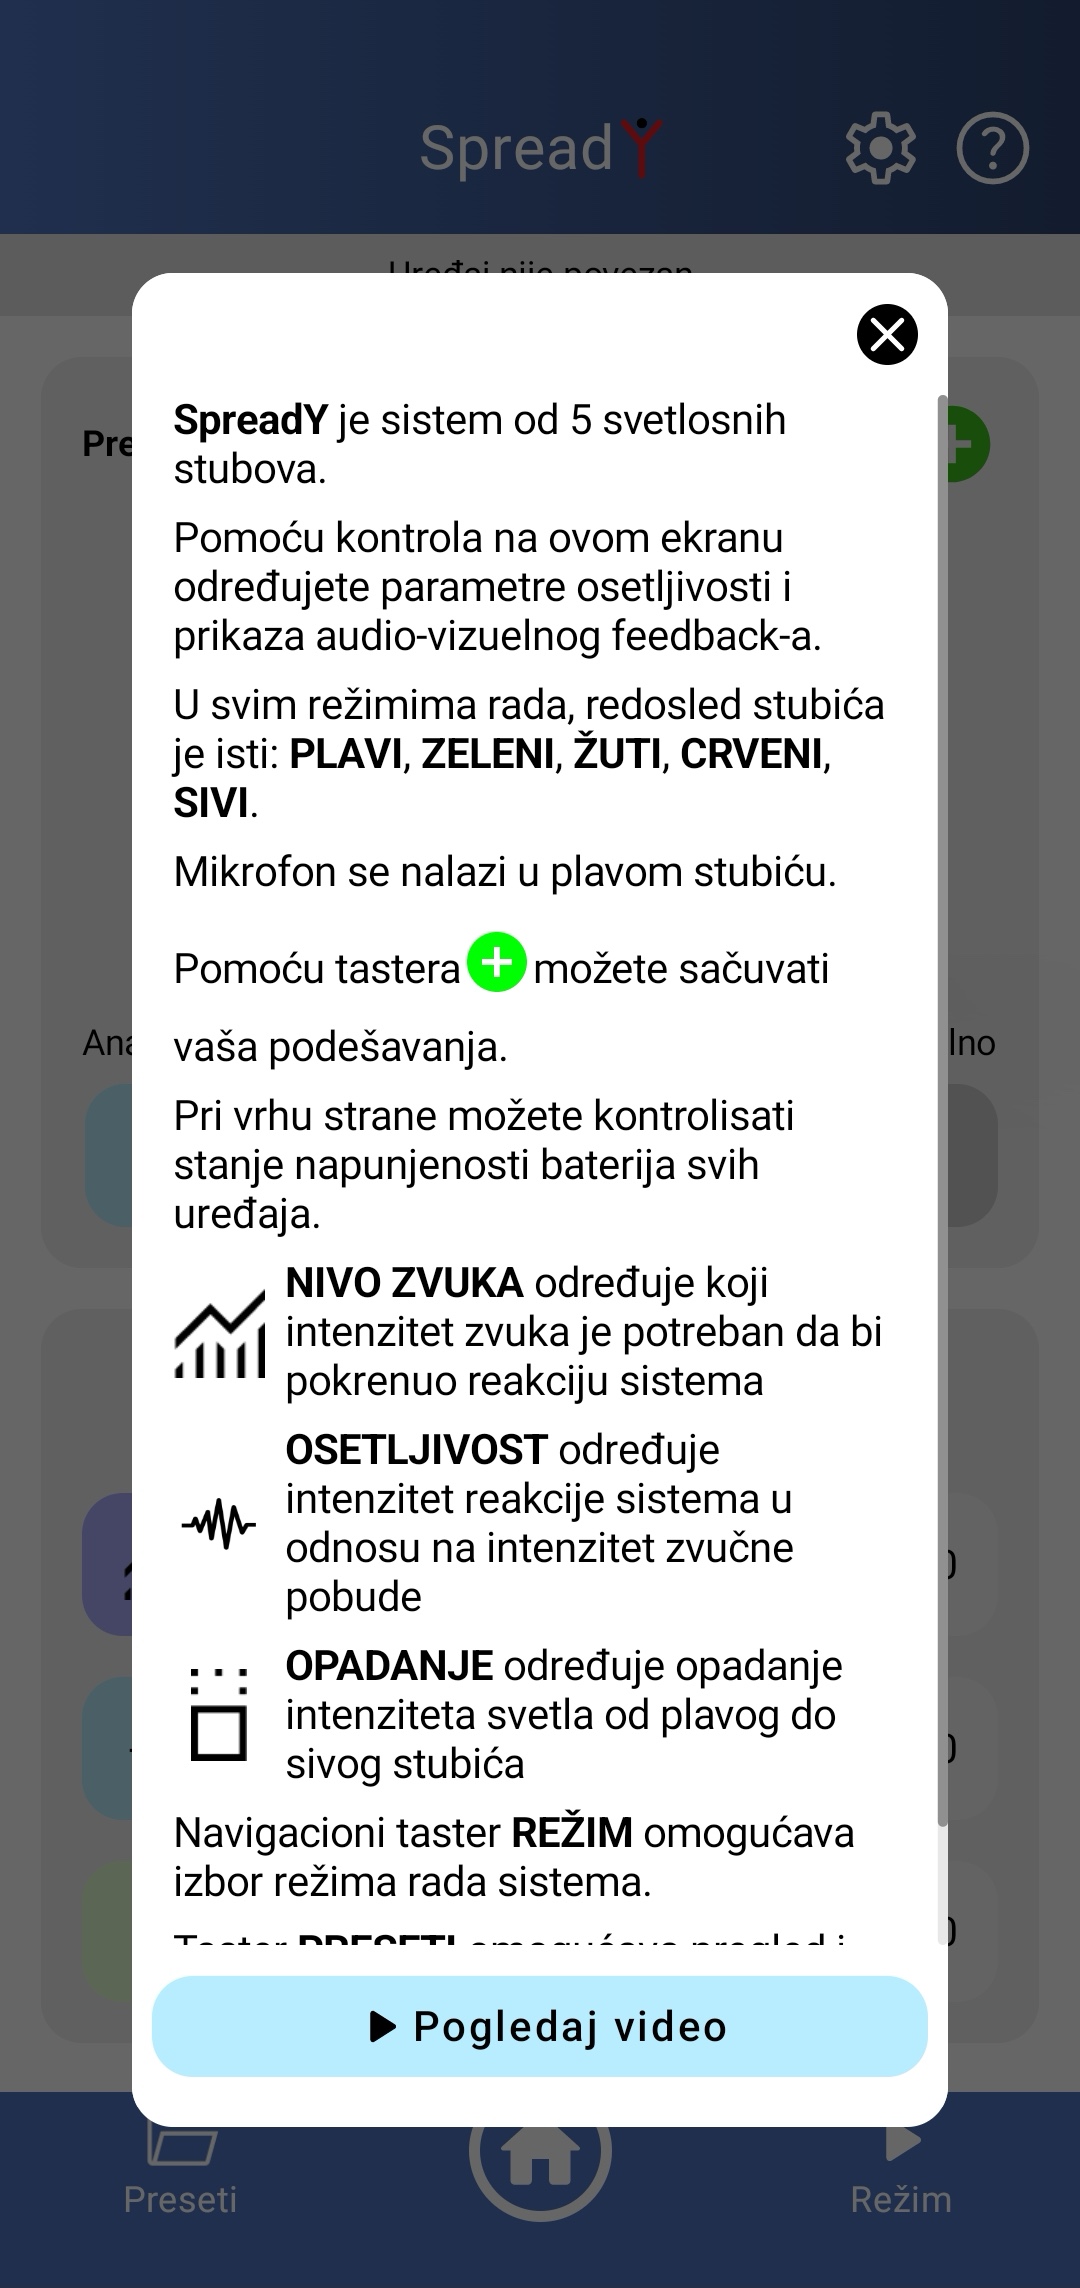
Screen view after pressing the question mark symbol
By pressing the question mark symbol a screen will appear with text that will help you recall the basic functions of the SpreadY application (image right). You can scroll the text down in order to read it to the end. At the bottom of the screen there is a "Watch video" button. By pressing this button you will access a detailed video tutorial that will show you the complete instructions for using your SpreadY device.
By pressing the "X" button you return to the screen of the SpreadY device, in the mode in which you previously used it.
Operating modes of the SpreadY device and their purpose
The SpreadY system offers three operating modes, with the following suggested purposes:
| Mode | Way of operation | Purpose |
|---|---|---|
| Microphone | reaction to sound | Visual identification of sound spreading |
| Memory | the user adjusts the parameters | Memory game and learning addition |
| Manual | the user turns on the columns at will | Analysis and synthesis of words and sentences |
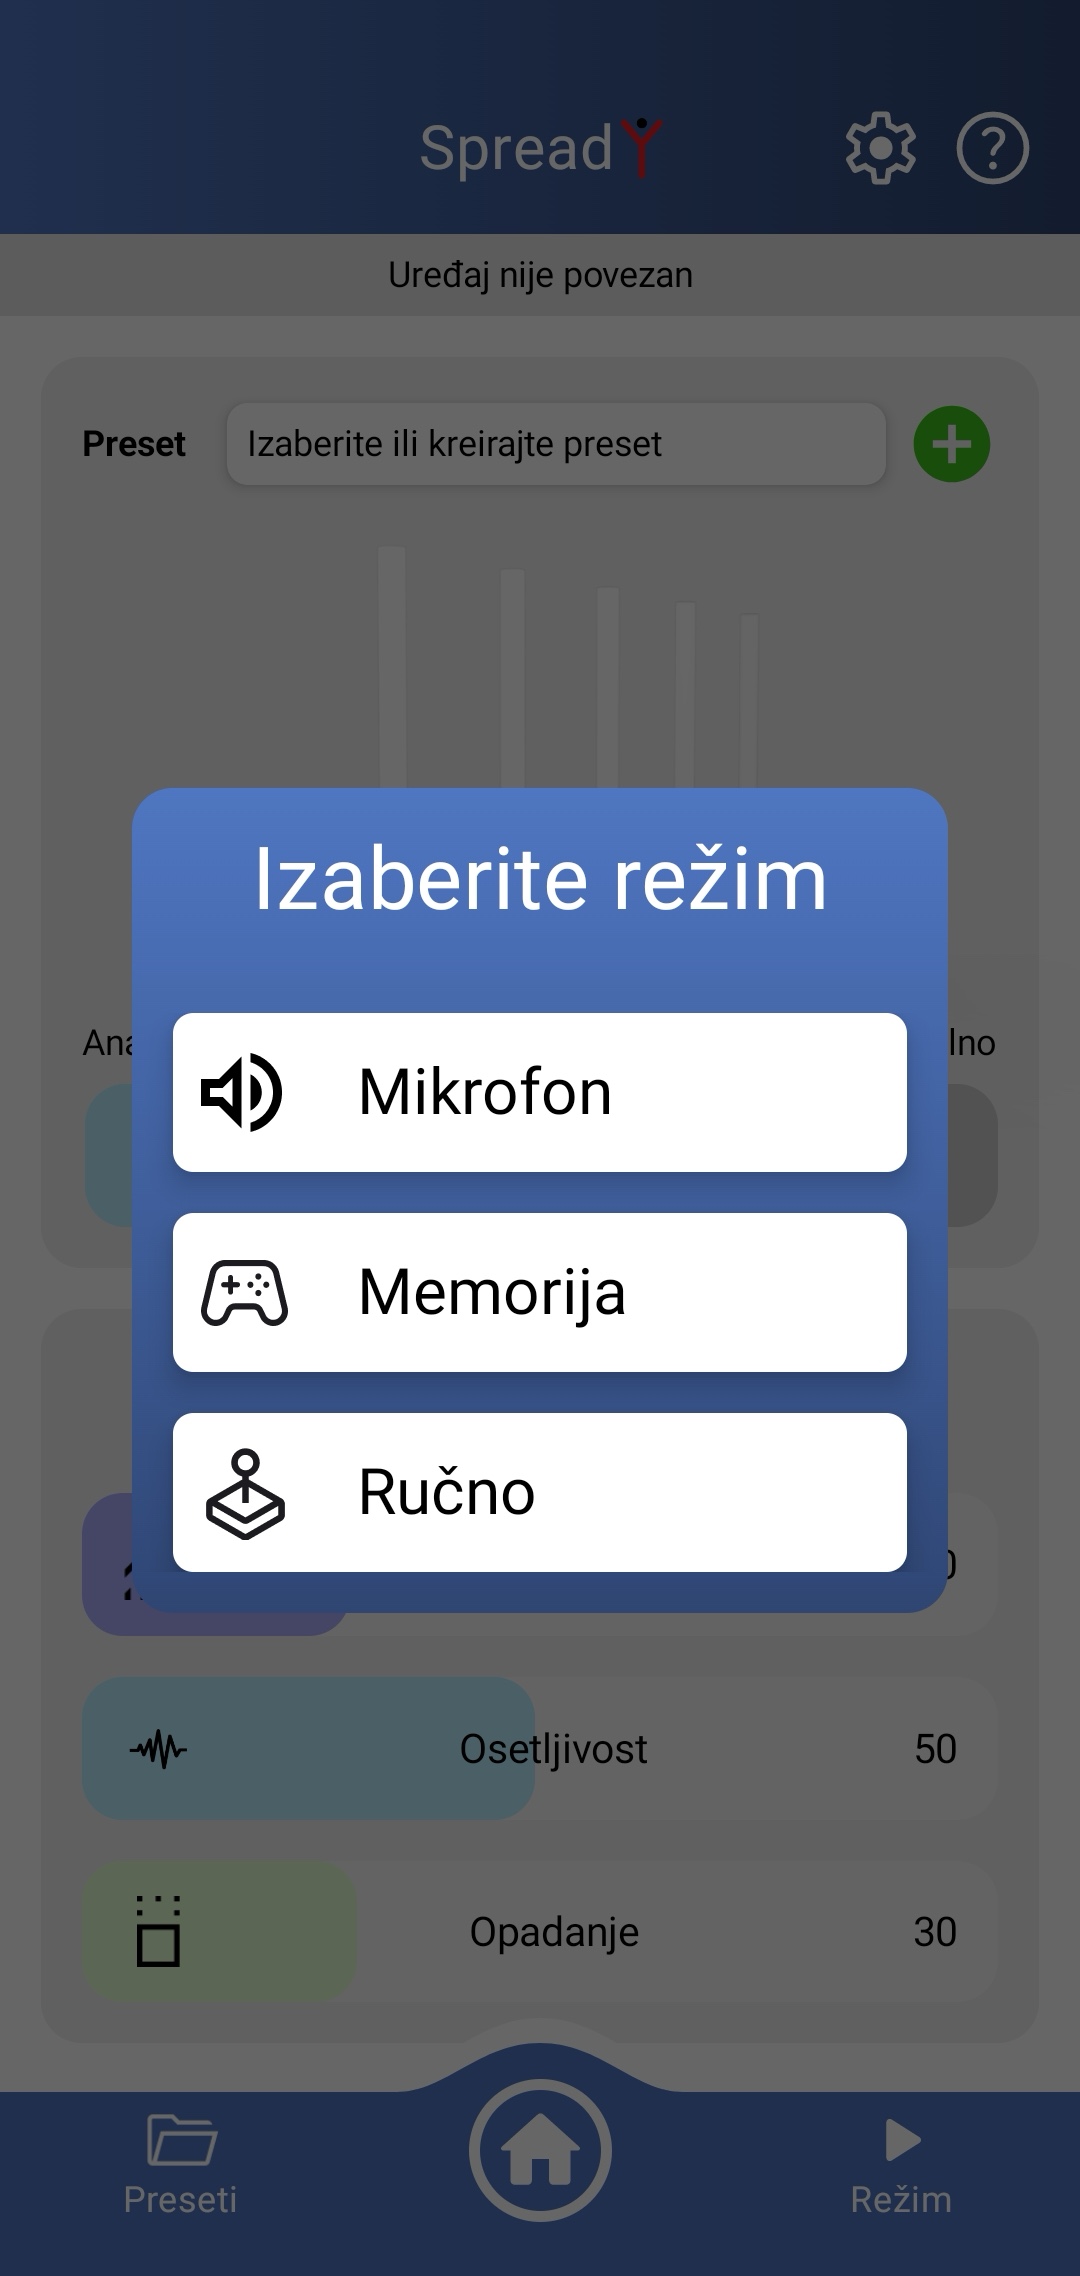
Operating modes of the SpreadY device: screen view after pressing the Mode button
The mode is selected by pressing the "Mode" button located in the right corner of the lower blue field of the application screen. In the image on the right you can see the screen view after pressing the "Mode" button. When you touch the label with the desired mode, a screen for the detailed adjustment of that mode will appear.
Below, the ways of accessing and using each of the listed modes are explained.
Microphone mode
After entering the menu for selecting the device's operating mode by pressing the "MODE" button, you select the mode of visual identification of the sound level by pressing the "Microphone" button.
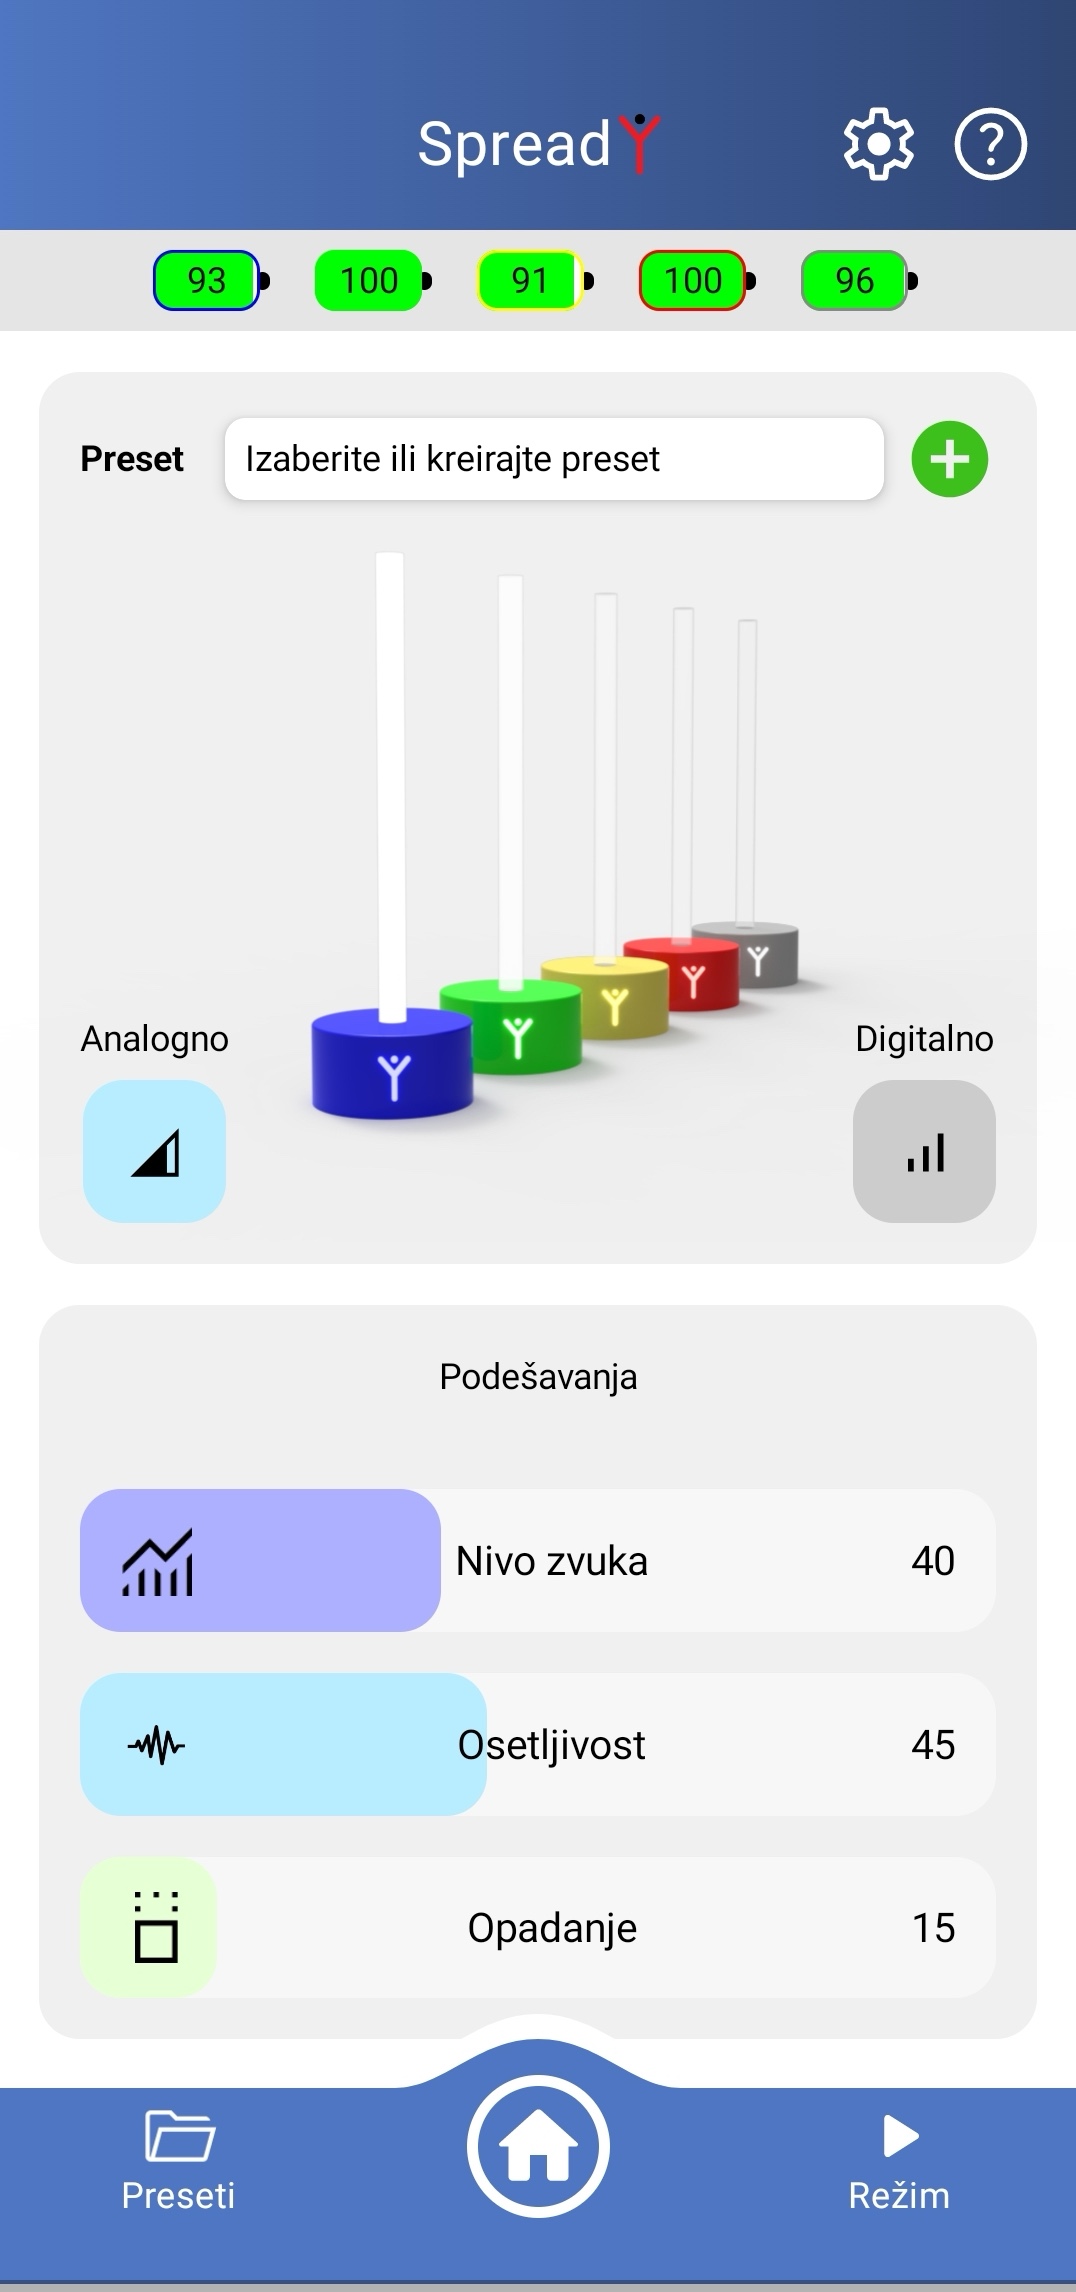
Microphone mode - home screen: battery indicators, preset options, sliders, display selection and system information.
The visual representation of sound can be analog or digital. The buttons for selecting the visual representation of sound, "Analog" and "Digital", are located in the middle of the application screen. In analog mode, all the columns glow together, and the intensity of the glow depends on the sound level. In digital mode the columns always glow at maximum intensity when the sound exceeds the level defined for each of them, and they light up one by one, depending on the sound level.
The adjustment of the sound level, sensitivity and decay in the analog mode, that is, the sound level, sensitivity and light intensity in the digital mode of visual representation of sound, is done using the sliders located in the lower half of the application screen, in the "Settings" section.
Sound level is the threshold that the sound level must cross in order to cause a light reaction. Sounds below this level are ignored. If you need to, adjust it according to the noise level in your space so that the blue column does not turn on when no one is speaking.
Sensitivity is the system's sensitivity to a change in sound level.
If you change it toward higher values, the system becomes more sensitive, and it can be triggered more easily. By moving the slider toward lower values, a higher sound level is needed for the device to be triggered, that is, for the lights to turn on.
Decay determines the decay of the light intensity from the blue to the gray column.
Light intensity adjusts the brightness of the light columns. The more you move it toward higher values, the brighter the light columns will glow.
If you change the parameters of sound level, sensitivity, light intensity or decay, you can save your settings in the way described on the following page.
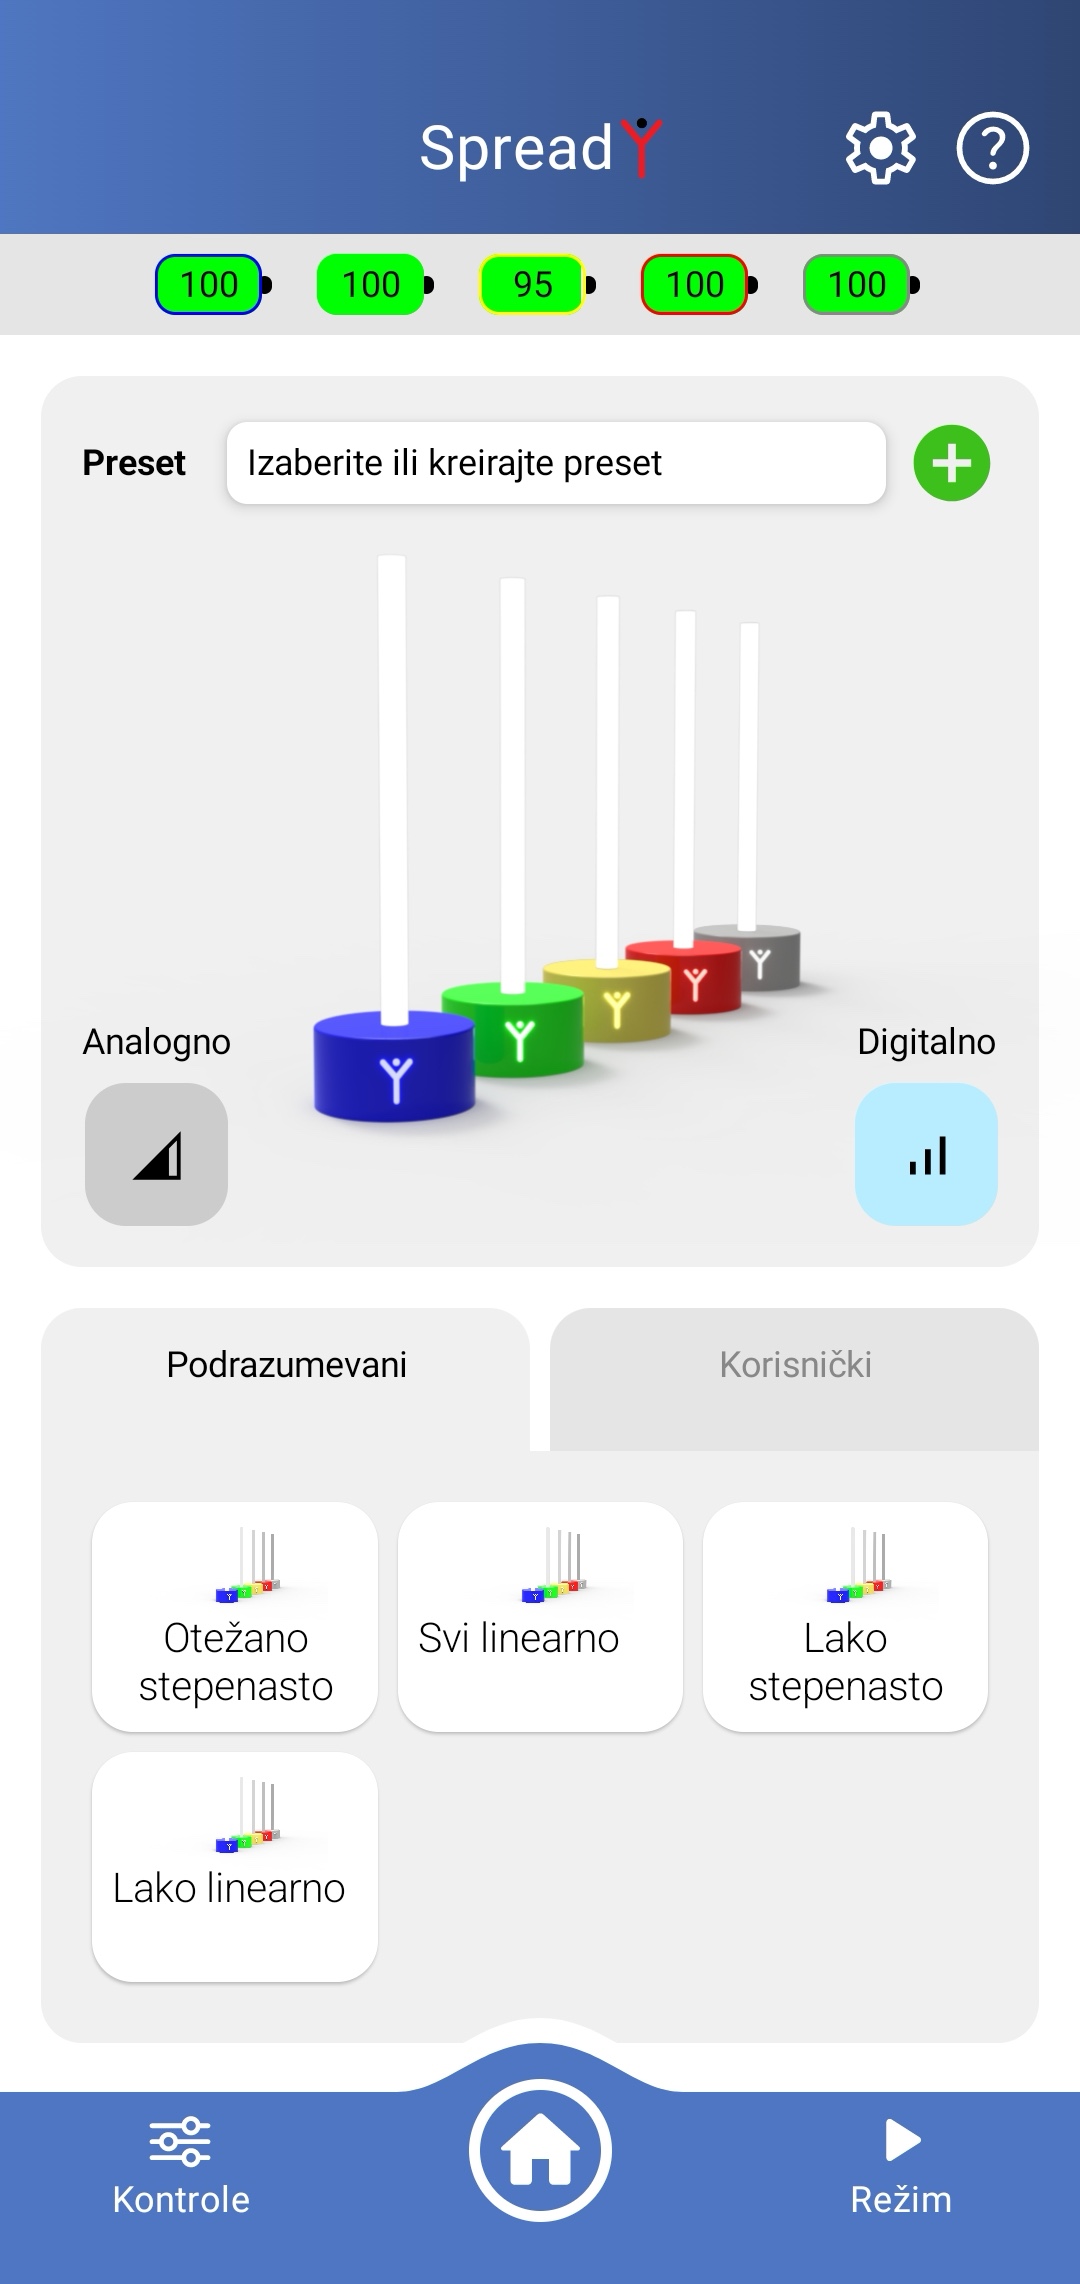
Microphone mode - settings: screen view after pressing the "Presets" button.
In the left corner of the lower blue field of the application there is a "Presets" button. By pressing this button, the lower part of the application screen looks as in the image on the right.
In this layout of the lower part of the application screen there are two tabs, with the names "Default" and "User".
Under the "Default" tab are the operating settings that are created in advance. Each of these settings is saved under a particular name that represents a description of the system's way of operation when the selected setting is activated.
Under the "User" tab are the settings that you have saved. The way of saving the settings that you have created is as follows: In case you have made a change to any of the offered parameters, you can save your settings by pressing the button located in the upper part of the screen.
A keyboard will appear on the screen. Type a name for the created setting and save it.
You can find your saved settings by pressing the "Presets" button located in the left corner of the lower blue field of the application screen, and then the "User" tab.
All the settings you have saved so far will be displayed.
Simply click on one of the buttons with the name of a saved setting and the system will immediately take on those settings and continue to operate according to them.
You can always return to the home screen of the "VoiceToys" application by pressing the button with the house image, located in the middle of the lower blue field of the application screen.
Memory mode - settings
3-7: After entering the menu for selecting the device's operating mode by pressing the "MODE" button, you select the mode of the memory game and learning addition by pressing the "Memory" button. The screen shown on the previous page will appear, in whose upper blue field you can see the mode the device is in and the buttons for system information and help. The function and the way of using these buttons are described on page 15.
The memory game generates sequences of random numbers from 1 to 5 and displays them by lighting up the columns. By adjusting the parameters, which is done using the application, you can determine the level of complexity of the game. The adjustment of the parameters is done using the sliders located in the lower part of the screen, whose layout is shown on the previous page.
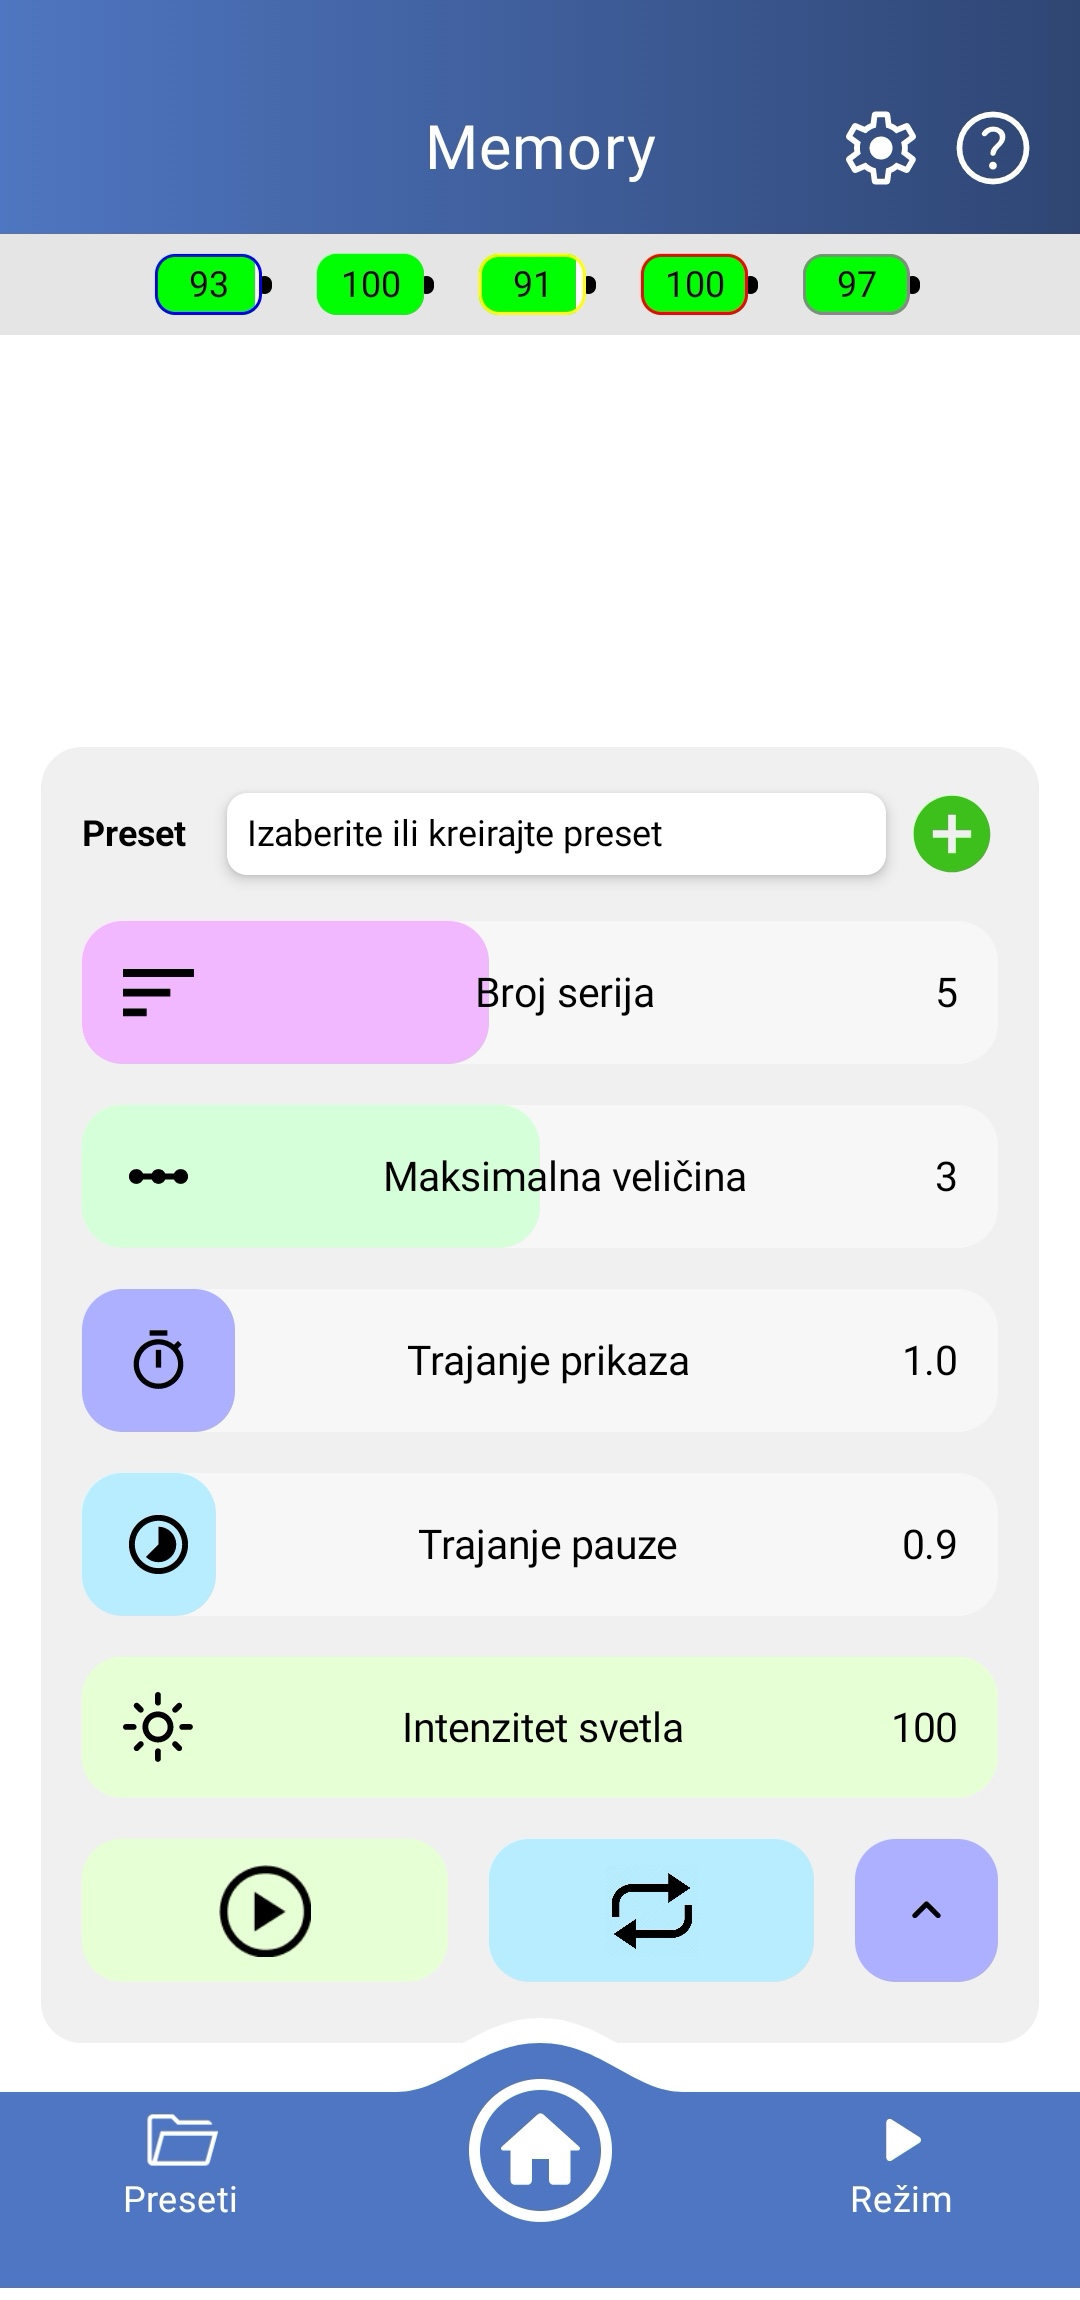
Memory mode - game parameters screen: series, exposure, pause, number of columns, intensity and commands.
Number of series determines how many series of column lighting there will be during one game. The smallest number of series is 1, and the largest is 10.
Maximum size indicates how many columns we will use during one series. We can determine that only one lights up, all the way up to all five columns. Once set, this parameter remains the same in all the series.
Display duration indicates the time during which the columns will be lit. The time is expressed in seconds.
Pause duration indicates the time during which the columns will be off between two series. The time is expressed in seconds.
Light intensity determines the intensity of the light with which the columns will be lit.
If you change the parameters of sound level, sensitivity, light intensity or decay, you can save your settings in the way described on page 19.
Below the sliders for adjusting the game parameters there are the PLAY ▶️ , REPEAT 🔁 and ARROW 🔽 buttons. Their purpose is explained on the following page.
In the lower blue field of the application screen is the "Presets" button, whose use is described on page 19. You can always return to the home screen of the "VoiceToys" application by pressing the button with the house image, located in the middle of the lower blue field of the application screen.
Memory mode - principle of operation
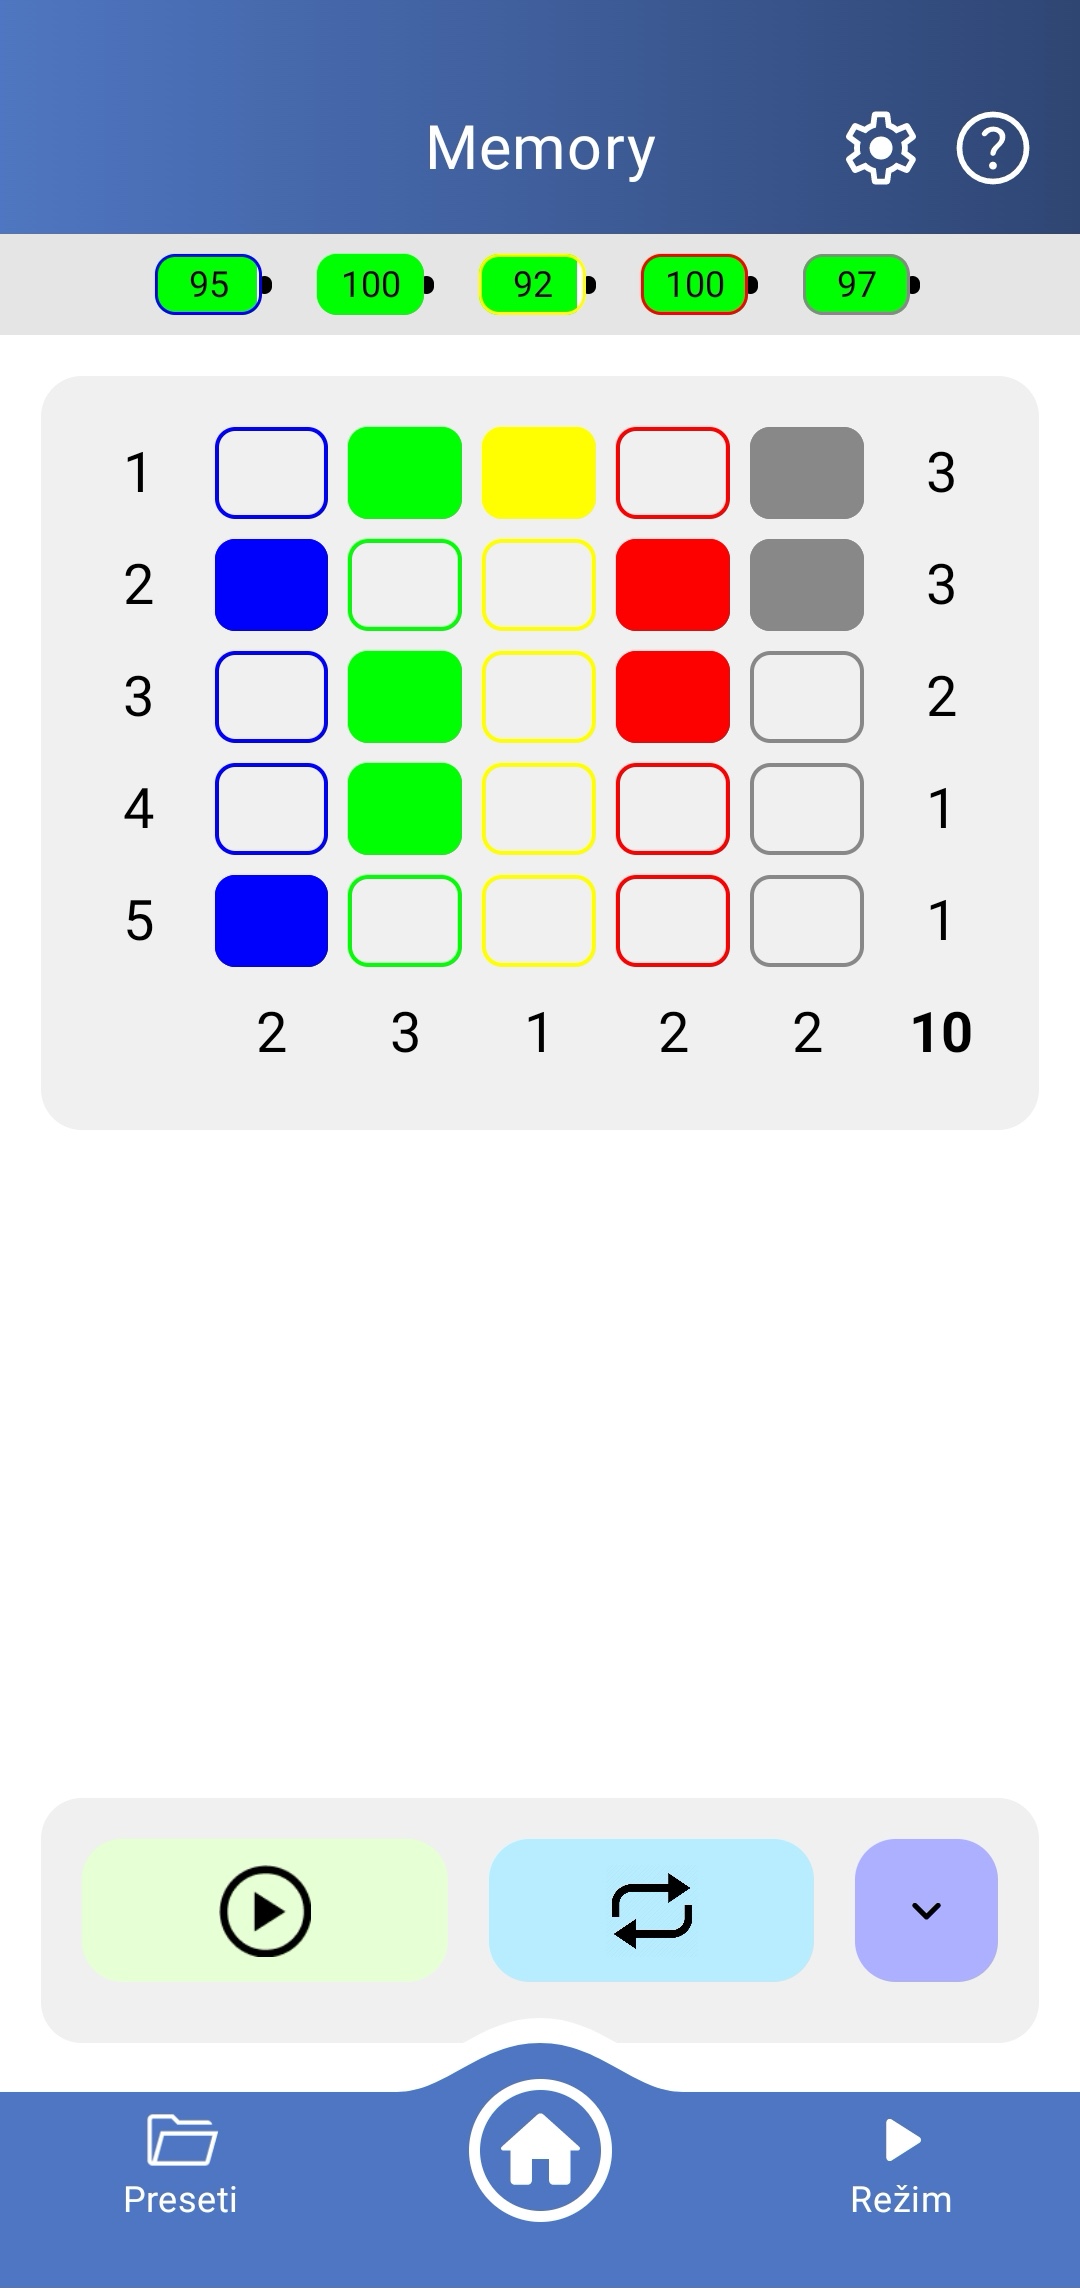
You start the game by pressing the ▶️ button. The columns will begin to light up, and on the screen the scheme according to which they lit up will be displayed. The view of this screen is shown in the image on the right.
The numbers in the left column indicate the number of the column-lighting series. In this example the game was limited to 5 series. The numbers in the right column indicate how many columns were lit in that series. In this example, in the first series 3 columns were lit, in the second also 3, in the third 2, and in the fourth and fifth one each.
The numbers in the bottom row indicate how many columns of a particular color were lit in total during the game. In this example there were 2 blue in total, 3 green, 1 yellow, 2 each of red and gray. The number 10 in the right corner indicates how many columns in total were lit during the game.
The colored fields indicate the columns of a particular color that lit up during each of the series. In this example, in the first series the green, yellow and gray columns were lit, in the second the blue, red and gray, and so on in turn.
The application determines by random selection which columns will light up in which series, and how many columns will light up in which series in relation to the set maximum display size, which is adjusted with the parameter described on the previous page.
By pressing the ▶️ button you start a new game with the same parameters that were previously set.
By pressing the 🔁 button you repeat the previous game, with the same set parameters.
If you want to change the parameters, by pressing the 🔽 button the sliders for controlling the game parameters will appear. You can remove them by pressing the same button again.
Manual mode
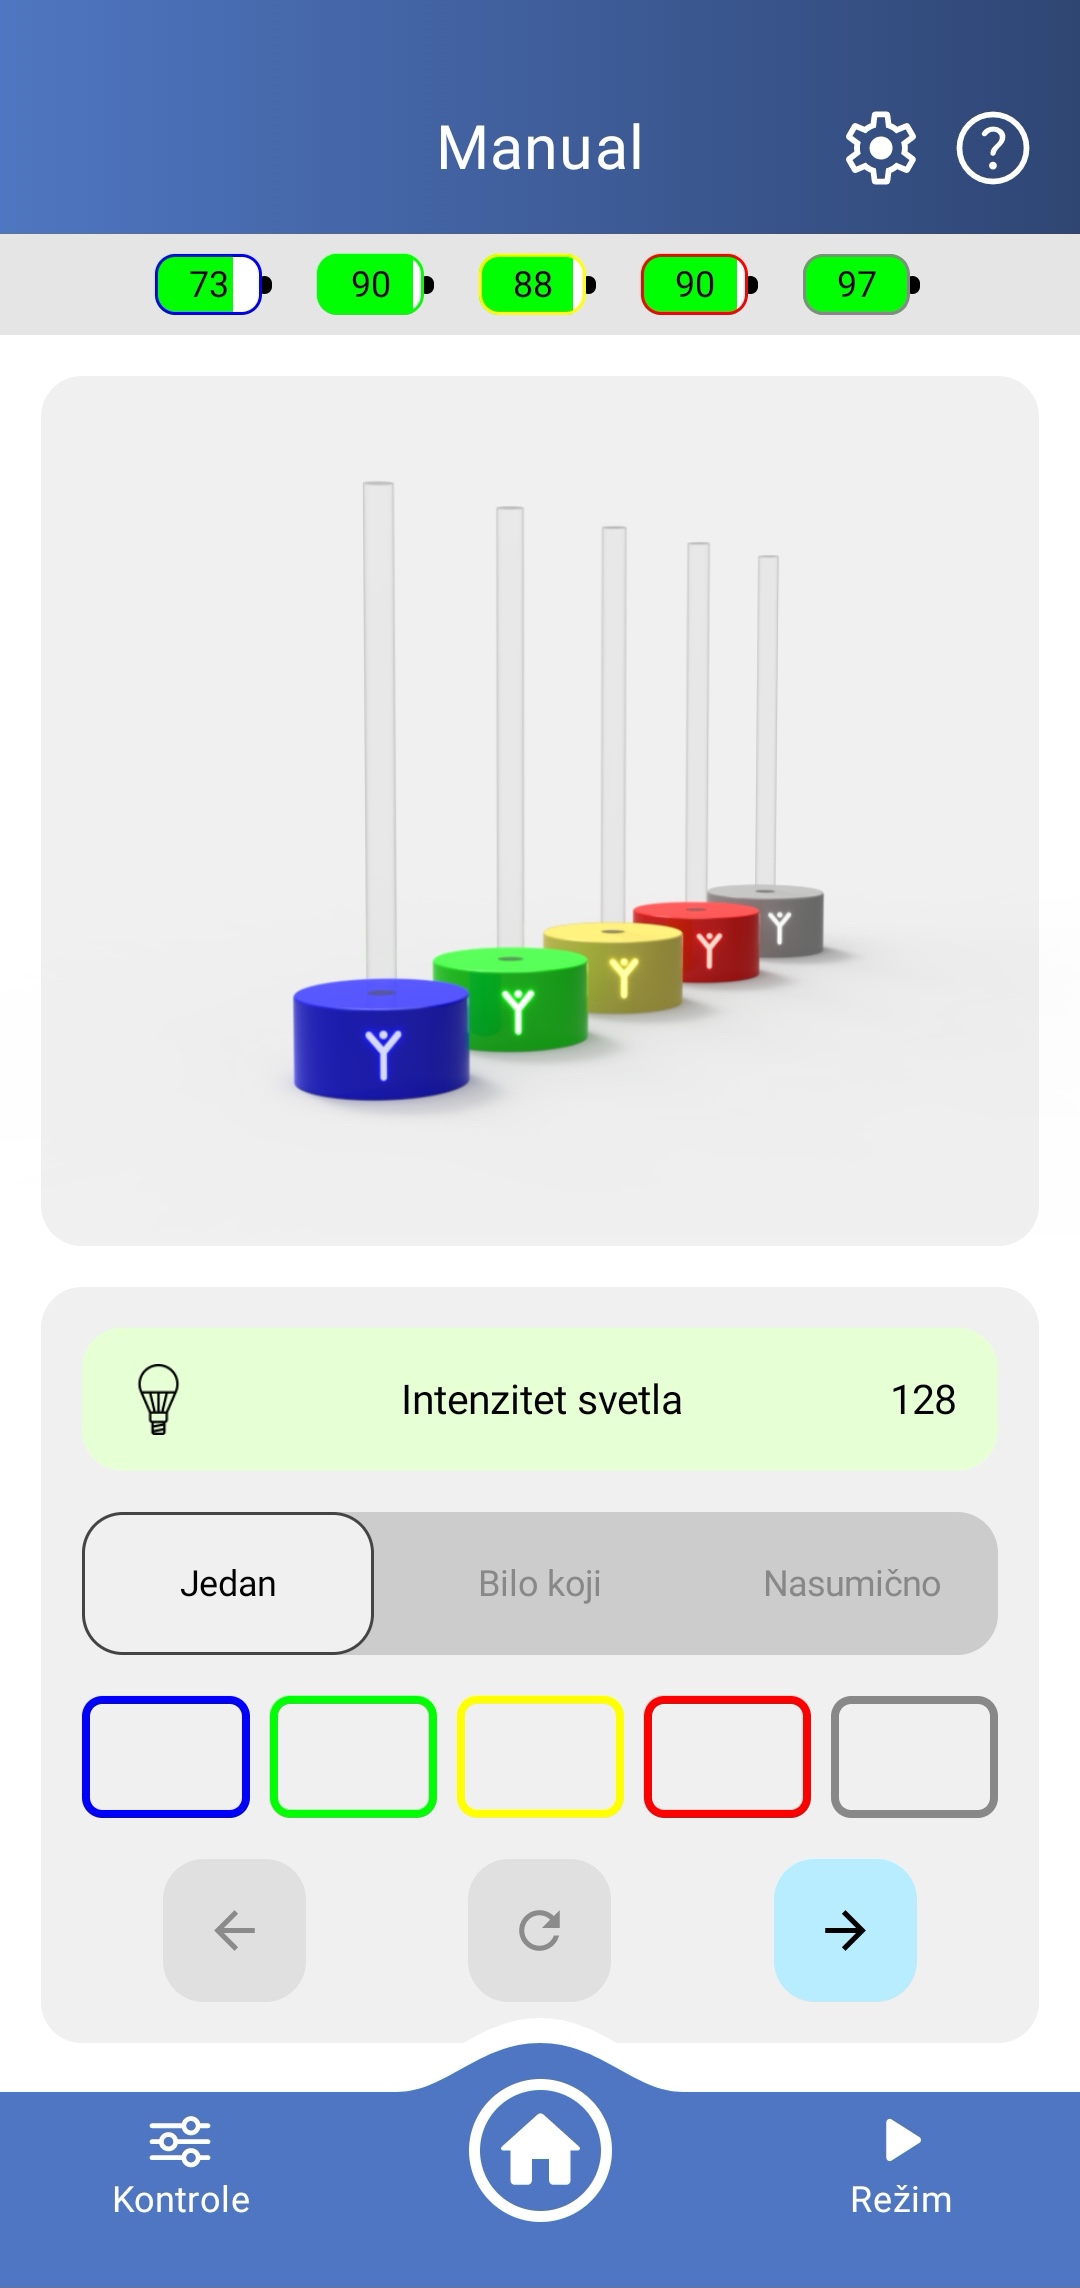
Manual mode: battery indicators, intensity, column activation and mode controls.
After entering the menu for selecting the device's operating mode by pressing the "MODE" button, you select the mode of the memory game and learning addition by pressing the "Manual" button. The screen shown on the previous page will appear, in whose upper blue field you can see the mode the device is in and the buttons for system information and help. The function and the way of using these buttons are described on page 15.
We note that in this case too, the same arrangement of columns applies as for the "Microphone" mode - blue, green, yellow, red, gray, as is also shown on the application screen.
For the analysis and synthesis of words and sentences, accessories are used - holders that are placed on the glowing rods, into which you can put cards with letters or images. The cards are not part of the "VoiceToys" system and do not come with the SpreadY columns.
The adjustment of the glow intensity is done with the "Light intensity" slider. It applies to all the columns.
The determination of the way of activating and displaying the lit columns is set by selecting one of the options shown in the following section.
One indicates the option in which only one column will light up and remain lit. We can light a column by pressing the field that is bordered with the color of the column we want to light. A colored field indicates that the column of that color is lit. We can choose which column we want to light, and when we light the next column - the previous one will turn off. We can light the columns in order from blue to gray and back by pressing the LEFT ⬅️ and RIGHT ➡️ buttons, and we turn off the columns by pressing the ↻ button.
Any indicates the option in which, by pressing the field that is bordered with the color of the column we want to light, we light one or more columns. We turn off a column by pressing the colored field again.
Random indicates the option in which the application will light one column by a random sample. The column will light up after pressing the PLAY ▶️ button, and we will turn it off and be ready for the next lighting by pressing the ↻ button. A colored field indicates which column is lit.
You can always return to the home screen of the "VoiceToys" application by pressing the button with the house image, located in the middle of the lower blue field of the application screen.